The Yaesu FT-530s
FM 70cm/2 meter transceiver
| Accessories | Modifications |
| Specifications | Manual |
 This is my second handy
talkie, and the first into which I put some thought, and spent some real money.
It is a dual band unit, covering the popular 2 meter and 70 cm bands. The
unit has a number of battery and power options, with a maximum output of five
watts. Maximum power attainable depends upon the power resource being used, with
the full five watts only being available while using the 12 volt pack, or an
external 12 volt adapter delivering 1.5 amps. Several charger options are also available, including
a drop in charger, and charger that plugs into a jack on the side of the battery
packs, or charging within the unit while hooked to AC power.
This is my second handy
talkie, and the first into which I put some thought, and spent some real money.
It is a dual band unit, covering the popular 2 meter and 70 cm bands. The
unit has a number of battery and power options, with a maximum output of five
watts. Maximum power attainable depends upon the power resource being used, with
the full five watts only being available while using the 12 volt pack, or an
external 12 volt adapter delivering 1.5 amps. Several charger options are also available, including
a drop in charger, and charger that plugs into a jack on the side of the battery
packs, or charging within the unit while hooked to AC power.
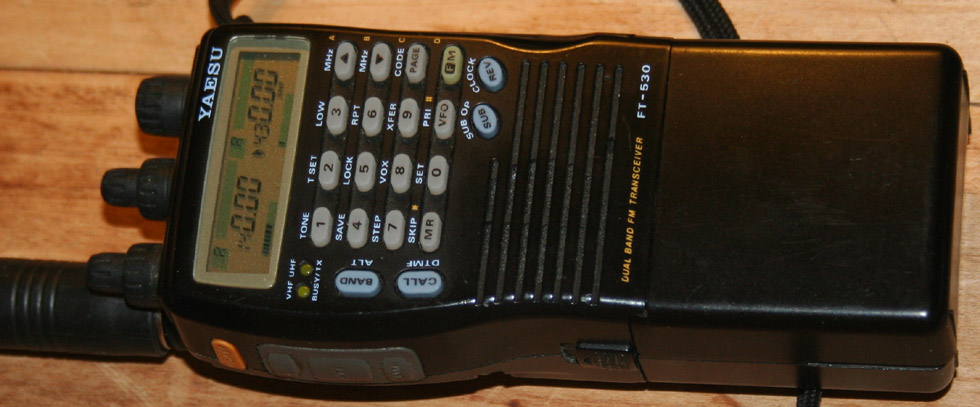
When compared to my other 2 meter HT, the 530 is large, heavy and well built. The radio body is made from metal, rather than the typical plastic. These are some of the best handi talkies ever built, and were in production from 1992- 1998, when they were discontinued, to the distress of the ham community. These units are pretty close to industrial quality, and have a full range of accessories.
What is really incredible about this is that it may be one of the world's smallest self contained repeaters. It is a cross band repeater, and may receiver on 2 meter and transmit on 440 - or vice versa. Admittedly it would only be a five watt repeater, but you could put a very efficient antenna at a good elevation, and probably get some pretty good range.
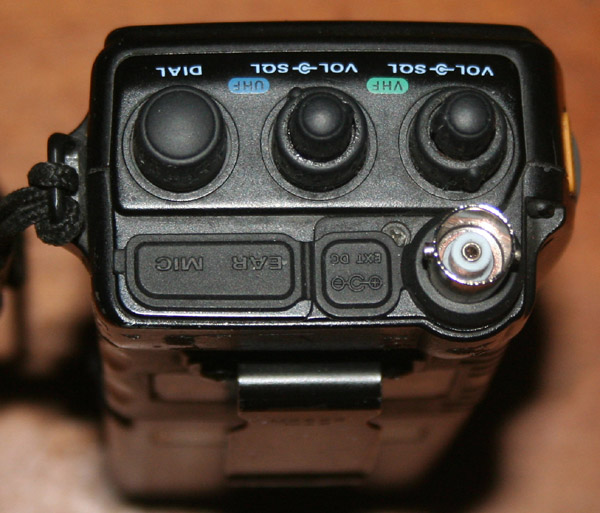
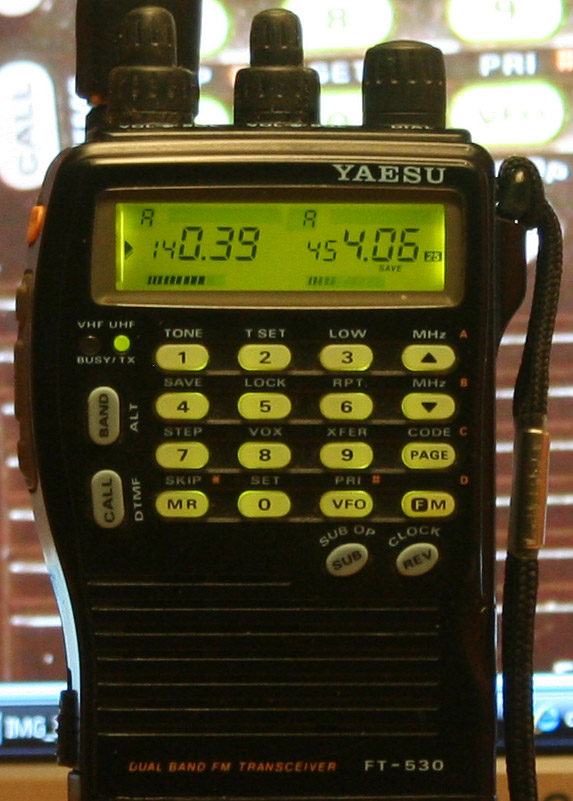
The top panel, as can be
seen in the photo to the left, has separate volume and squelch controls for each
band, and a knob to adjust frequency on the selected band. There is also a jack
for an AC adapter (4 mm positive tip) which can accommodate an ac supply of
between 5.5 and 16 volts, and a dual connector for an external speaker and mike
- which is similar to the Kenwood standard, but just different enough that the
Kenwood style can not be made to fit. There is also a standard BNC type antenna
connector, making it pretty easy to hook up to an external antenna or coax.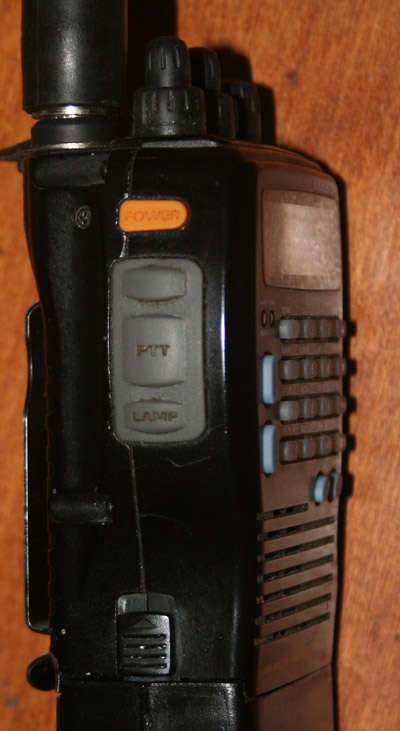
The side of the unit has the standard arrangement of PTT, Lamp, Monitor, and power buttons. The orange power button needs to be held down for a couple of seconds to turn power on or off. Monitor buttons are pretty common on commercial radios, and simply allow you to break the squelch without having to reset it. This is also where the latch is located to release the battery.
The front face of the unit is where most of the action is. This is the location of the LCD display and 20 key keypad. This radio has so many features that all of the keys have multiple functions. Even over a decade after it was introduced, the model has some pretty impressive features. These include separate receivers for each band (which is what permits cross band repeater operation), dual frequency monitoring in each band, 41 memories per band, internal VOX circuitry, and extended monitoring of frequencies outside of the ham bands. Though this is an FM transceiver, it is capable of being used in AM mode, by entering the proper sequence of keystrokes.
The LCD display has separate 5 1/2 digit frequency indicators for each band, as well as separate bar indicators for S/RF. There is also a separate transmit/receive LED for each band. Offset, battery condition, and a multitude of other conditions are also shown on this display. Both the display and the keypad can be backlit by depressing the lamp button.
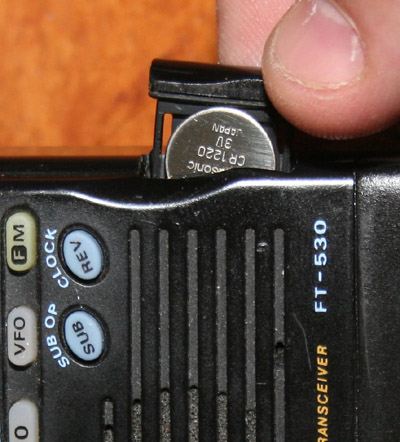 One interesting addition is a fully featured clock. The clock can be set to
automatically turn the radio off or on, and even to wake you up in the morning
with an alarm. It can also be set up as a timer. The clock settings and time,
along with all other stored information in the radio, is preserved by a small
lithium button battery. This three volt CR1220 battery is easily user
replaceable by sliding out a battery holder from the front panel. This is a nice
feature and far better than having to open the radio, and perhaps desolder and
old battery.
One interesting addition is a fully featured clock. The clock can be set to
automatically turn the radio off or on, and even to wake you up in the morning
with an alarm. It can also be set up as a timer. The clock settings and time,
along with all other stored information in the radio, is preserved by a small
lithium button battery. This three volt CR1220 battery is easily user
replaceable by sliding out a battery holder from the front panel. This is a nice
feature and far better than having to open the radio, and perhaps desolder and
old battery.
 I
don't much care for DTMF; but this radio is capable of storing 10 codes of 15
characters each. I make occasional use of it, but usually prefer to continually
monitor a frequency. Still, it can be a nice feature if you are expecting a
call, or if you are out in the field with a number of other radio operators.
This can be set to merely open the squelch or to sound a pager tone.
I
don't much care for DTMF; but this radio is capable of storing 10 codes of 15
characters each. I make occasional use of it, but usually prefer to continually
monitor a frequency. Still, it can be a nice feature if you are expecting a
call, or if you are out in the field with a number of other radio operators.
This can be set to merely open the squelch or to sound a pager tone.
For those new to two meter, DTMF tones are what you hear on your touch tome phone. They are double tones, which can activate certain responses in circuitry set to monitor for them. The FT-530 can store eight such tones in its memory, though it is also possible to enter them manually through the keypad.
With DTMF activated, the radio automatically identifies itself, as do all other radios making use of this system. For some types of repeater use, DTMF codes can also be used to activate special functions on the repeater.
CTCSS tones are continuous and subsumable. They are used to open repeaters, and the FT-530 has all the standard tones. One very neat feature is that the radio can listen for tones, and identify a tone that it receives. this can be quite nice when you are in a strange area and do not know the tones for use with the local repeaters. The FT-530 is also set up to allow use of subaudable tones for paging.
Any repeater offset can be used, by entering transmit and receive frequencies individually. Most users will simply use the automatic offset feature which can be set for 600KHz, 1.5 MHz, 5 MHz, or 7.7 MHz. Each memory location can store repeater offset, frequencies, CTCSS and DTMF.
The unit is capable of scanning memory channels, a selected segment of a band, or an entire band. It is possible to scan both bands at once, and to lock out certain channels or frequency segments. it is even possible to use this unit as a PS/PB/Air scanner, due to the extended receive that it has.
There are four transmitter power levels. They can be set from half a watt to five watts, depending upon power source. maximum power output with the 7.2 volt battery is 2 watts. A twelve volt battery or adapter (capable of at least 1.5 amps) is required for the full five watts.
In addition to low power settings, the unit has a number of battery saving features, including automatic shut off, and power reduction when an unmodulated carrier is being sent. Various features of the radio can be turned off as well, including the LEDs which indicate transmit and receive. With all of the power saving features enabled, and a twelve volt power pack attached, this unit could work unattended as a packet radio or cross band repeater for a long time.
Batteries can be
charged by internal circuitry while the radio is plugged in and operating. The
manual advises that the external power supply must provide a voltage that is at
least two volts higher than that of the batteries in the unit, in order to
properly charge them. The battery packs also have an input jack so that the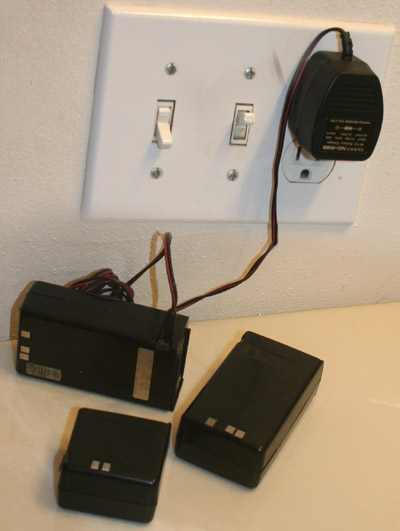 DC power adapter can be plugged directly into the batter. One hour chargers and
fifteen hour chargers are also available, as drop in units.
DC power adapter can be plugged directly into the batter. One hour chargers and
fifteen hour chargers are also available, as drop in units.
The original battery selection was between 7.2 volt units with either 600 mAh, 700 mAh, or 1000 mAh, or else a single 12 volt pack rated at 600 mAh. Also offered was a case for six AA cells. Technology moves on, and today it is possible to get 1000 mAh 12 volt battery packs, and 1800 mAh 7.2 volt packs from aftermarket companies. These will fit and charge just like the originals, but provide much more operating time.
Shown in the photo to the right is a standard nine volt (8.7 nominal) battery charger. As it only puts out 60 mAh, it can not be used as a power supply for the radio. Also visible in the photo are a pair of specially made 2200 mAh 7.2 volt batteries, built by W&W Associates, as well as a standard 7.2 volt 600 mAh battery. As of right now, I have no twelve volt batteries. Mobile with the 7.2 volt batteries, I can only transmit at two watts. Hooked up to my 12 volt AC power supply, I can put out five watts.
I also discovered how easy it is to rebuild a battery pack. Along with my good battery packs, I got one dead pack. Opening it us (as I usually do with things that don't work), I was surprised to see that it consisted merely of six AA rechargeable batteries connected in series, and hooked through a diode or some such thing. It was easily rebuilt using the new 2600 mAh NiMH batteries now available. These cost about $2.50 each at American Science and Surplus. I could also have picked up 1700 mAh NICD batteries for about a dollar each at the same place. Batteries and power supplies can be had pretty cheaply at places like American Science and Surplus. Or you can pay through the nose for them by buying from radio shops or aftermarket suppliers.
This unit uses as little as 16 mA, with the power saving features enabled, and no more than 190 mA with everything turned on, the external speaker/mike plugged in, and monitoring both bands. It uses 1.6 amps when transmitting. What this means is as many as thirty hours with the low powered 600 mAh pack, and as much as 75 hours with the higher capacity packs - so three days of continuous operation without the need to change or charge. And there is always the possibility of plugging a gel cell or some other type of high cap battery into the top mounted power input.
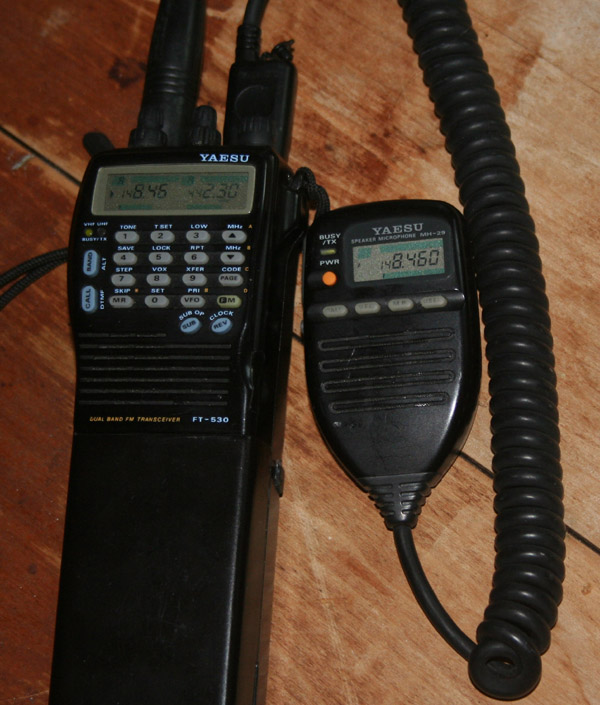 A number of accessories
are available for the radio, but one of the neatest is the external display
microphone. This bypasses the speaker/mike on the radio, when plugged in. This
is more than just your regular speaker/microphone. The microphone has a clip for
attaching to the belt or lapel, and a coiled six foot cord. There is also a
provision for using an earphone.
A number of accessories
are available for the radio, but one of the neatest is the external display
microphone. This bypasses the speaker/mike on the radio, when plugged in. This
is more than just your regular speaker/microphone. The microphone has a clip for
attaching to the belt or lapel, and a coiled six foot cord. There is also a
provision for using an earphone.
It has a single band backlit display that shows all of the information on the radio display, and can be easily switched from one band to the other. It also has an LED to indicate TX/RX.
The top of the microphone has buttons for scrolling through frequencies, and the front of the unit has a power switch, as well as four programmable buttons to be used in emulating radio keypad functions. It even has its own lamp button to light the microphone display as well as that on the main unit.
The miniature control panel is quite handy, particularly for outdoor use in bad weather, or when the radio is plugged into an external power supply, and connected to an external antenna. For times that I am feeling really lazy, which happens more and more often as I get older, I can hang this radio by my bed, hook up the external display mike, and plug into the AC power supply.
Other external speaker options are a regular speaker /mike with no controls or display, and a miniature mike. A VOX headset is also available, to make use of the built in VOX circuitry.
Other options are the usual charger, power supply, antenna and carry case offerings. In truth, the radio is pretty complete as it comes, and does not really need much in the way of accessories. Still - we gadget freaks love to buy our toys.
It would have been nice to be able to program and configure the unit using a cable and a PC, or possibly to operate it from a PC, as the front panel operation can be a bti complicated, as is attested to by the size of the operating manual. Still, you can't have everything - though you very nearly can.
Like some other 70 cm radio, the FT530 can be modified so that it can also be used on the GMRS/FRS bands. With a suitable license for GMRS, it is legal to transmit with up 50 watts on duplex GMRS, and as much as 7 watts on simplex FRS. The license costs $85, and no test is required. It may be worth doing, for those who wish to use their ham radios to talk to non-hams. I go into a bit more detail about this in my FRS/GMRS page. WARNING. I have been advised that it is not legal to use this radio on GMRS, even if you are licensed and the radio is not using excessive power. It turns out that only a radio specifically type approved for such use would be legal. Sorry for any misunderstandings. Thus the mods shown below would be for experimentation or emergency use only.
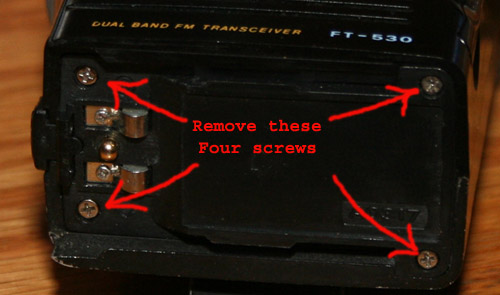 |
With the battery removed, these four screws, securing the battery holder to the two halves of the case, must be removed. |
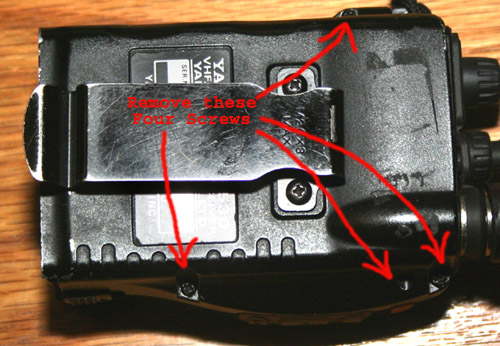 |
These four screws holding the two halves of the case together must now be removed. With all four screws removed, the case halves need to be very carefully separated. Please note that there is a very delicate ribbon cable connecting components, and that you must exercise extreme caution in separating the halves. Refer to the photos below, to familiarize yourself with the location of the ribbon cable. In addition, you need to be very careful not to pinch the ribbon cable between the two halves of the case when reassembling the radio. |
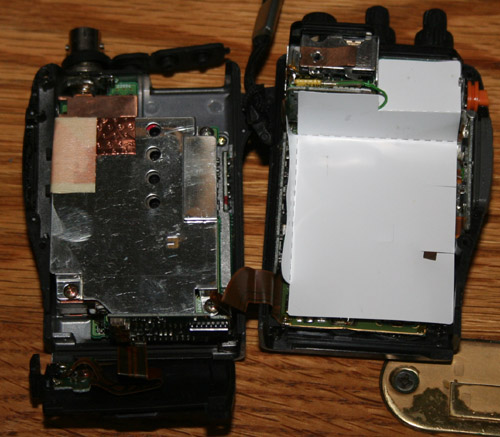 |
With the front and rear portions of the unit separated, you will see a large paper insulator. This will need to be carefully removed, and set aside to be replace latter. Note that there is a metal grounding tab sticking through to ground the PC board to the rest of the chassis. |
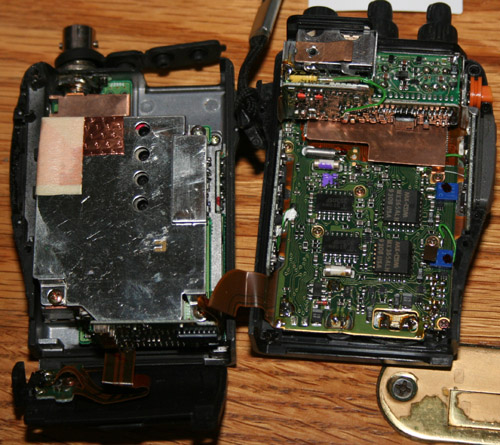 |
This is the PC board, exposed by the removal of the insulating paper. the jumper pad is in the lower right hand side of the PC board - opposite the ribbon cable. |
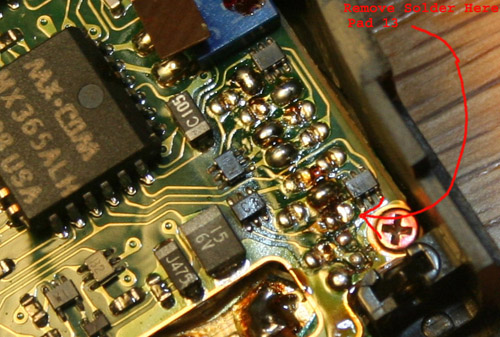 |
Pad 13 is actually not that difficult to find, though
nothing is really marked out on the board. It is just at the bottom
corner of a small 6 pin mini IC above the screw holding the PC board to
the case. Note that Pad 13 is the only pad in its row. Some of the newer
models do not have the pad soldered, but have a small green wire
connecting both sides. For these models, cutting the green wire will
perform the mod. Expanded Receive 110-180, 300-500 MHz Expanded Transmit 130-180, 400-470 MHz Note that this will also enable the unit to receive on cell phone frequencies that are normally blocked. Once this hardware mod is made, there are a number of keystroke options that will enhance the features of the radio. They can be found all over the web. |
| Type: | Amateur VHF/UHF transceiver |
| Frequency range: | TX: 144-146 / 430-440 MHz (Europe and Asia) TX: 144-148 / 430-450 MHz (USA) RX: 110-180 / 300-500 / 800-950 MHz Steps: 5/10/12.5/15/20/25/50 KHz |
| Mode: | FM |
| RF Power output: | Hi: 5/5 W Lo: ?/? mW |
| Receiver system: | N/A |
| Sensitivity: | N/A |
| Selectivity: | N/A |
| Image rejection: | N/A |
| Voltage: | 5.5-16 VDC |
| Current drain: | RX: 16-190 mA TX: Max 1.6 A |
| Impedance: | 50 ohms, BNC |
| Dimensions (W*H*D): | 55*134*33 mm (with FBA-12) |
| Weight: | 530 gr (with FNB-27 and antenna) |
Local Repeaters
| Repeater | Transmit (user receive) | Receive (user transmit) | Tone | Offset | Location | ||||||||||||||||||||||||||||||
| MRC | 146.910 | 146.310 | 127.3 | 600Khz - | Milwaukee | ||||||||||||||||||||||||||||||
| MAARS | 145.130 | 144.530 | 127.3 | 600Khz - | Milwaukee | ||||||||||||||||||||||||||||||
| WARC | 147.390 | 147.990 | 127.3 | 600Khz + | Pewaukee | ||||||||||||||||||||||||||||||
| SEWFARS | 146.820 | 146.220 | 127.3 | 600Khz - | Wales | ||||||||||||||||||||||||||||||
| MRAC | 145.390 | 144.790 | 127.3 | 600Khz - | Milwaukee | ||||||||||||||||||||||||||||||
|
|||||||||||||||||||||||||||||||||||