Restoring and plating my Dan Wesson Revolver
Eventually, every gun owner or collector will end up
needing to have a firearm refinished. This is particularly true for blued
firearms, which are really not very well protected. In my own case, I own
a pair of former police duty S&W model 28 revolvers, and have just purchased
a very rough Dan Wesson 44 Magnum. In all three cases, the guns were bought
because the quality of their finish made them very low in cost. I can live
with the M28 revolvers for a while yet, but the Dan Wesson was in need of
immediate attention.
It had occured to me to have the gun reblued by a local
gunsmith. The cost for this service would have been $125 to $160, and would
not include getting out some of the deeper gouging, though the smith promised
to do what he could. After giving the matter some thought, I deceded to nickel
plate the gun myself. After giving the matter even more though, I decided
upon the electroless method.
Why electroless?
There are a number of handgun finishes out there, but
when practical considerations are looked at, for home application, the number
drops. The factors taken into consideration are:
- Ease of application, and skill required.
- Protection given to the gun
- Cost
- Appearance
In general, the finishes available to the home refinsher are:
| Finish |
Protection |
Cost/Time |
Application |
Looks |
| Parkerizing |
Good |
$30 / 2-3 hours |
Easy |
Poor (an acquired taste) |
| Cold bluing |
Poor |
$20/1 hour + prep |
Easy |
Fair |
| Rust bluing |
Poor |
$20-$25/3 days |
Tedious |
Excellent |
| Teflon |
Good |
$30/ 2-3 hours |
Easy |
Good |
| Electroplating |
Excellent |
$10-$20/1 hour + prep |
Difficult |
Very good |
| Electroless plating |
Excellent |
$20-$25/1 hour + prep |
Easy |
Very good |
The teflon and parkerized finishes are applied from
spray cans, and then baked in the oven for a period of time. They are easy
to apply, but many people do not like their looks. Teflon offers very good
rust protection by itself, but Parkerizing only protects if the piece is
well primed with oil. The Parkerized finish then holds the oil in place and
gives very good protection against rust.
Bluing gives the worst rust protection. Really, it gives
no rust protection at all. Blued guns need the constant care, oiling, and
wiping down which has become very nearly a religion among gun owners. Only
safety is given more emphasis than cleaning oiling and proper storage of firearms.
Traditional gun blue is a form of surface rust which is brushed and boiled
to "set" it. The boiling process slightly changes the rust into a darker
and harder form of iron oxide, which will not flake off, like regular rust.
This is rust blue, or hot blue. Cold blue is different, does not look as
good, does not wear as well, and is generally not as satisfactory. Most cold
blues use phosphor or copper compounds, and essentially dye the metal, rather
than resurfacing it as hot blue does. Cold blue is all right for minor touch
ups of nicks and scratches, but looks terrible on any large areas, and does
not last.
Plating offers the best protection of any metal surface
treatment.
Day One
The gun would need to be disassembled, before the finish
and rust could be taken off. With the Dan Wesson, this process is 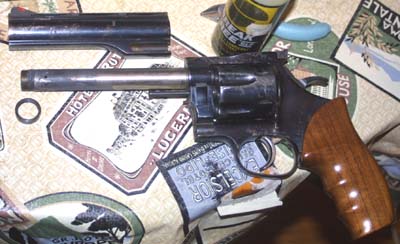 childishly easy. the first step is to remove the barrel. This is generally
done with a special two pronged wrench which fits into a pair of notches in
the barrel nut. My 357 wrench did not fit, but a pair of needle nose pliers
worked fine. The nut came off with little trouble, but the shroud was very
snug, and stuck a bit coming off. It eventually relented to steady pressure,
and the judicious use of Break Free. The barrel itself came off easily after
similar treatment with Break Free. Two things surprised, and pleased me. The
first was discovery that this was a stainless steel barrel, the second that
the barrel, and the shroud both utilized the Dan Wesson recoil reduction system,
a sort of MagnaPort clone. The barrel was quite dirty around the gas ports,
but as it was stainless, there was no rust. This cleaned up pretty easily.
childishly easy. the first step is to remove the barrel. This is generally
done with a special two pronged wrench which fits into a pair of notches in
the barrel nut. My 357 wrench did not fit, but a pair of needle nose pliers
worked fine. The nut came off with little trouble, but the shroud was very
snug, and stuck a bit coming off. It eventually relented to steady pressure,
and the judicious use of Break Free. The barrel itself came off easily after
similar treatment with Break Free. Two things surprised, and pleased me. The
first was discovery that this was a stainless steel barrel, the second that
the barrel, and the shroud both utilized the Dan Wesson recoil reduction system,
a sort of MagnaPort clone. The barrel was quite dirty around the gas ports,
but as it was stainless, there was no rust. This cleaned up pretty easily.
The frame itself showed little rust, on the inside, though
there was some around the threads for the barrel. There was what appeared
to be a slight rusting of the thread area of the barrel, but this turned out
to be nothing more than some slight frame rust which had rubbed off during
disassembly. This too, was a 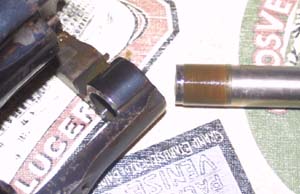 pleasant surprise. Further disassembly required the use of a hex wrench.
This
pleasant surprise. Further disassembly required the use of a hex wrench.
This 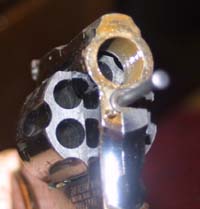 is a feature of the entire Dan Wesson line, and though it can be a pain
sometimes, there are some excellent reasons for it. Anyone who has bought
a used revolver, or has done some work or internal cleaning on a revolver,
has seen scratched frames, and chewed up screw heads. This does not happen
with hex head screws. A bit of Break Free had to be used to get everything
apart. What little rust there was cleaned up easily.
is a feature of the entire Dan Wesson line, and though it can be a pain
sometimes, there are some excellent reasons for it. Anyone who has bought
a used revolver, or has done some work or internal cleaning on a revolver,
has seen scratched frames, and chewed up screw heads. This does not happen
with hex head screws. A bit of Break Free had to be used to get everything
apart. What little rust there was cleaned up easily.
Once the barrel was off, I removed the one piece grips,
which are held on by a single large hex screw. The next step was the removal
of the modular trigger assembly which holds most of the internal lock work.
This is snapped in place by a catch at the front, and by a spring loaded latch
at the rear. The latch can be pushed forward with a hex wrench or a screw
driver, which allows the trigger housing to be pulled down. It is then pivoted
down to release from the front catch, and removed as a single unit. I set
the trigger group aside, and put all small parts in an envelope, so that
they would not get lost, and so that I would 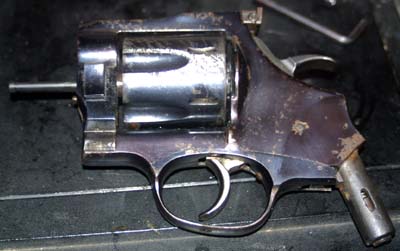 have some idea of where they belonged when the time came for reassembly.
All parts came out with the trigger assembly except for the hammer, which
was held in by a roll pin, and the mainspring.
have some idea of where they belonged when the time came for reassembly.
All parts came out with the trigger assembly except for the hammer, which
was held in by a roll pin, and the mainspring.
The only parts left were the mainspring, which sits in
the nub at the base of the frame, and the ball which acts as a rear latch
on the cylinder. The mainspring comes out pretty easily once all of the lockwork
is removed. Is can simply be pushed out the top of the frame with a paper
clip. The rear latch comes out by unscrewing a small cover which holds it
in place. All of these parts were carefully put in their own envelope, along
with the rear site, and the screw and roll pin which hold it in place. This
is about as far as I was able to disassemble the piece. The frame mounted
firing pin was still inside, as I could find no way to get it out, and the
assembly drawing I had of the Dan Wesson gave me no clue. This is an internal
part, so I should be able to get away with sealing it somehow, so that it
does not get fused together during the plating process.
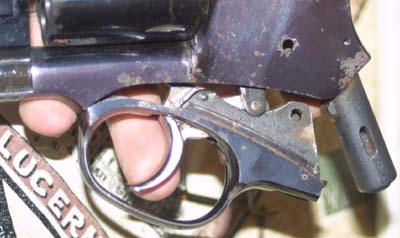
The most difficult part was getting the cylinder out.
It is held in by a sort of a shim which sits towards the front of the trigger
guard latch. This holds a spring loaded collar in place which is in turn screwed
into the cylinder crane. These parts are held together like a puzzle, with
another spring loaded part (the cylinder timing latch) holding everything
in. There is a great fear of breaking something, while manipulating these
parts to get them out. 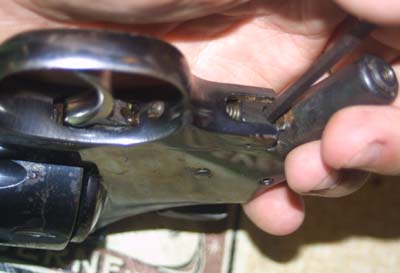
Once all of the parts were cleared out, and placed in
envelopes, I gave the inside of the frame a good brushing to release any loose
dirt or rust. I the gave everything a good cleaning, first with solvent and
then with hot water. it felt odd running water over a gun, but everything
has to be out for the next step, which is the chemical removal of all rust
and bluing. If there are any chemicals or dirt on the gun, they will protect
the surface from, the action of the rust and blue remover. The internal parts
were quite clean and rust free, as was the inside of the frame. It seems that
the outer finish had borne the brunt of the changes wrought by exposure, and
rough handling. I suspected this might be the case, even before opening the
gun, because of the easy smoothness of the trigger pull. The entire restoration
project would be an exercise in vanity then, since the gun seemed to need
no mechanical repair or adjustment. My only worry now, would be not to lose
any parts, and to be able to remember how to reassemble the gun after it was
refinished. I was also beginning to reconsider my choice of electroless nickel.
This was because of the obvious depth of some of the gouging of the gun.
Plating shows up every flaw, while a mat finish like Parkerizing tends to
hide small imperfections. Still, there is really no better protection than
plating, and nickel along with hard chrome are the best finishes to plate
with.
 I would have plenty of time to decide. Calling it a day,
I
I would have plenty of time to decide. Calling it a day,
I 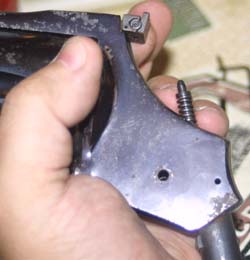 put all of the large parts in a box, and included the envelopes containing
the small parts. The next day I would remove the finish. I had a new bottle
of bluing and finish remover, which was supposed to make the job easy. Just
in case, I also had a moto tool, sandpaper and steel wool. This would be the
hard part. Once the finish started to be removed, there would be no turning
back.
put all of the large parts in a box, and included the envelopes containing
the small parts. The next day I would remove the finish. I had a new bottle
of bluing and finish remover, which was supposed to make the job easy. Just
in case, I also had a moto tool, sandpaper and steel wool. This would be the
hard part. Once the finish started to be removed, there would be no turning
back.
Total time spend disassembling the gun was a bit over
an hour. This was certainly a simple job when compared to taking down a S&W
or a Colt. This is particularly true concerning the removal of the barrel,
which is a major undertaking on a traditional revolver, but is a normal part
of user service on a Dan Wesson. So far there were no real surprises or complications.
The modular construction of the Dan Wesson makes disassembly quite easy. The
only problem has been the removal of the cylinder and timing parts. I am
not looking forward to reassembling them.
Day two
Having completely disassembled the gun, put the parts
in order, and taken photos for future reconstruction, it was now time to
get the finish and the rust off. I tried using one of the commercial spot
and rust removers, but was a bit disappointed in the results. In some areas,
the remover did not work at all, in others it left a mottled appearance.
Eventually some extra fine sandpaper and steel wool ended up doing the job.
Having been for years, vary careful about the finish of my guns, there was
something perversely satisfying in being able to take sandpaper, and steel
wool to blued steel. The finish came off easily, but there were some pits,
scuffs, and gouges that had to be smoothed out. This was where I realized
that, though I could certainly improve it's 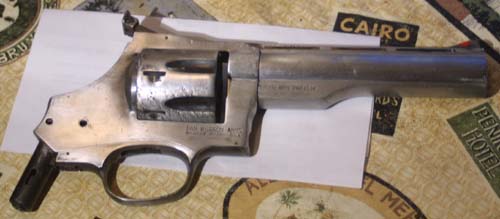 looks, this gun would never look like new.
Once the finish was removed, I began to pay special attention
to the areas where the gun was badly scratched. Some of the gouge marks were
quite deep, and there was nothing to do but grind them out, buffing simply
would not remove them. The problem here is that metal can only be removed,
not added. So I had first to grind the gouges out, then smooth the edges,
and finally attempt to blend them in with the surrounding areas. The frame
and barrel shroud came out very well, but the cylinder had some particularly
bad gouging that I had to take a stone to. After stoning comes fine sandpaper,
then extra fine sand paper, and eventually steel wool. For a mirror like finish
I could have used a buffing wheel and rouge, but I had already given up on
this because of the obvious imperfections that grinding out the pits and
gouges would leave. My best bet would be a satin finish.
I have not been too fussy about the inside of the frame,
since this would not show, and the plating was for cosmetic purposes anyway.
the inner surfaces would be sealed or coated so that most would remain unplated.
Judging from the initial condition of the inside of the gun, these areas are
pretty well sealed and protected as it is. Having removed the finish from
the four major components (frame, barrel shroud, trigger unit, cylinder),
I once more put the parts aside, and called it a day. This time, a bit over
two hours was spent working on the gun.
as can be seen from the photograph, this gun is now "in
the white" which is to say it is bare steel. This looks very similar to a
brushed satin stainless. Plating the gun, may slightly change the color, but
this is essentially what the finished gun will look like, if I do no more
polishing. The appearance is not too bad, except for the cylinder. I am once
again considering Parkerizing or some other mat finish to hide the many surface
flaws. I am still deciding how much I am willing to grind on the cylinder
to remove the surface gouging. I will have to decide tomorrow. I am considering
the purchase of a new cylinder, and may take this route if I see one at a
good price on ebay or gunbroker. Decisions, decisions.
Day Three
This is probably the most important part of the process,
so naturally it is the most tedious and unpleasant. Having gotten the finish
and rust off, it is now time to buff out the nicks, and smooth the metal
surfaces. With an electroless finish, the plating pretty much exactly molds
itself to the surface of the gun. The final result will be directly related
to how well this step is carried out. The frame, trigger unit, and shroud
are nearly done, and will just require a bit of polishing, which should not
take too long or be very difficult; the cylinder is a different story.
There are some very deep scratches on one side of the
cylinder, as if the gun was thrown or slid across concrete. Grinding the cylinder
down will remove the marks but will give a slightly uneven surface. I am
considering checking ebay or gunbroker for a replacement cylinder. With a
new cylinder, I can get the gun to look just about new. In the meantime, I
am doing my best to get the cylinder as smooth as possible.
The project is, for now, at a standstill. I have packed
up the gun, and put the small pieces for various assemblies in separate envelopes.
I will do the actual plating in late fall, or early winter.
Day Four
Now for the fun part. After all of the prep work, this
is what it really boils down to (almost literally). Applying an electroless
finish has been compared to coloring easter eggs. The chemicals are mixed,
and then the water is heated to a certain point. The finish is applied by
emersing the parts in the liquid for a specific period of time, depending
on how thick a plating is desired. This generally takes less than an hour
for a coating suitable to protect a firearm.
Small pieces can be put into a cage, while larger pieces
need to be positioned in such a manner that all parts to be plated are exposed
to the solution. I plated the hammer, and the trigger, as well as the frame
and shroud. The sights, barrel (stainless), and internal parts were not plated.
the process
the tools
the chemicals
the preparation
the cost
the result