The Kenwood TK-860
UHF FM transceiver
| Manual (760 - same radio) | Frequencies | Base antenna |
| Going Mobile | Specifications | Programming |
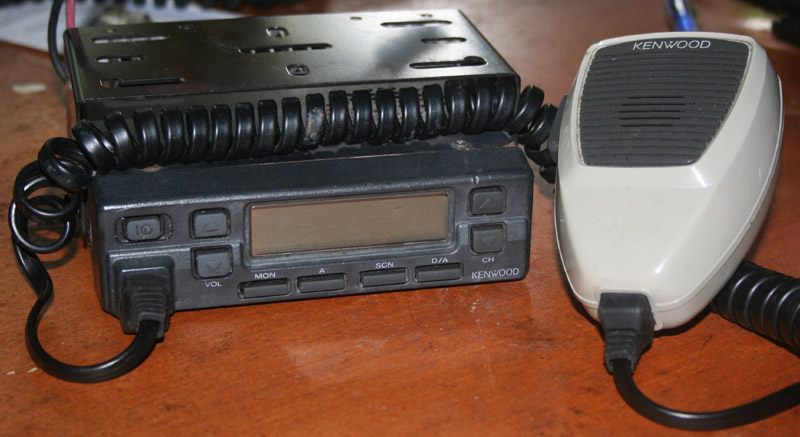 Nice little radio.
Like my Console five, and a few others, this is not really a ham radio, but it
is part of my shack anyway. The TK-860 is a commercial two way radio, designed for
fleet users like police, fire, or commercial utility use.
Nice little radio.
Like my Console five, and a few others, this is not really a ham radio, but it
is part of my shack anyway. The TK-860 is a commercial two way radio, designed for
fleet users like police, fire, or commercial utility use.
Though this radio is designed to use a frequency band near to 70cm, I do not consider it to be a 70 cm radio, and will make no serious attempt to use on on that band. Instead, I have programmed it to use the GMRS/FRS frequencies. The radio is a type 1, rated for use on 450 MHz - 476 MHz - ideal for GMRS/FRS, but presumably not so good for the 420 MHz - 450 MHz 70 cm ham band. It was designed as a mobile radio, but I most often use it as a base.
The radio requires 13.8
VDC power, which I already have in my shack. It also requires an external
antenna, which I easily built and mounted. Output power is 25 watts (5 watts
low) on 32 channels - more than sufficient for GMRS/FRS. It is capable of duplex
operation, and can use the 25 or 12.5 (narrow band) channel width. This is the
basic radio - other models are available which put out 35 watts on as many as
128 channels. I paid a bit over $50 including shipping, for this radio.
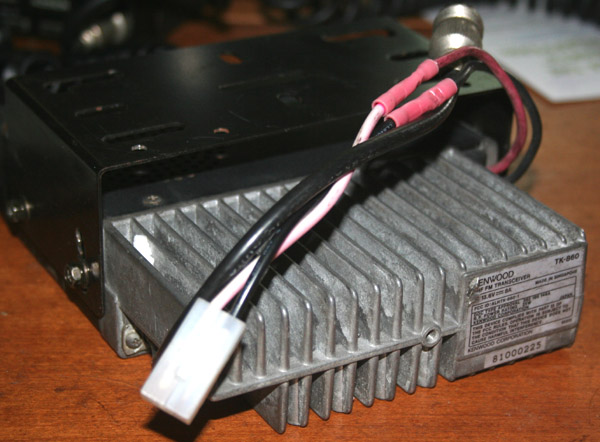
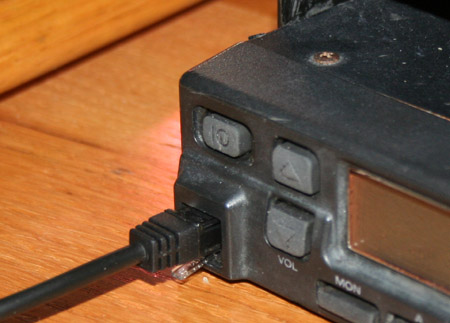
Like most commercial UHF/VHF radios, the TK-860 uses a pigtail coax connector and has a massive heat sink. These things are built like tanks, and are designed for rough full time use by commercial operators. Everything about them is overbuilt and first class. Unfortunately, everything about them assumes the services of a radio tech, making them a bit of a chore to set up and program. Still, it can be done.
There are probably better choices for 70cm due to the channel limitations on this radio. At the new narrow band standard, it would require 1600 channels to hit every 70 cm frequency. The 32 channels of the TK-860 just are not enough. For FRS/GMRS it is nearly ideal. The fifteen GMRS channels, along with the seven unique FRS frequencies still leave ten unused channels - possibly for 70cm repeater use, in case I decide to attempt 70 cm on this radio. The 25 watt high (50 allowed on GMRS), and 5 watt low (7 watts allowed when talking to FRS on shared FRS channels for GMRS license holders), are a good match for the legal limits on these services.
Operating on GMRS requires a license. There is no test, but there is an $85 fee every four years. You are also required to use a call sign during transmissions. On the plus side, you do not have to be a licensed radio operator to use GMRS, so your family members could use your radio. A GMRS license also allows you to operate on shared FRS frequencies at 7 watts when talking to FRS users, instead of the 500mw limit of regular FRS users. So really you can talk to just about anyone. GMRS transceivers can also use antenna systems which provide gain, and are allowed repeaters and base stations. Use of this radio on the seven dedicated FRS frequencies would be illegal, due to the removable antenna, and higher power.
The TK-860 is able to work the duplex channels of GMRS, as well as the simplex channels of FRS. It is also capable of generating and responding to tones, which is handy for repeaters on 70 cm as well as GMRS. Though FRS is getting to be a busy place, GMRS is still pretty usable, particularly when most of those who use the frequencies are doing so from cheap little units that use half a watt and a no gain antenna.
Present frequencies programmed
| Channel | freq | freq (duplex) | tone | name |
| 1 GMRS 550 | 462.550 MHz | 467.550 MHz | ||
| 2 GMRS 575 | 462.575 MHz | 467.575 MHz | ||
| 3 GMRS 600 | 462.600 MHz | 467.600 MHz | ||
| 4 GMRS 625 | 462.625 MHz | 467.625 MHz | ||
| 5 GMRS 650 | 462.650 MHz | 467.650 MHz | ||
| 6 GMRS 675 | 462.675 MHz | 467.675 MHz | ||
| 7 GMRS 700 | 462.700 MHz | 467.700 MHz | ||
| 8 GMRS 725 | 462.725 MHz | 467.725 MHz | ||
| 9 "5625" or "FRS 1" | 462.5625 MHz | |||
| 10 "5875" or "FRS 2" | 462.5875 MHz | |||
| 11 "6125" or "FRS 3" | 462.6125 MHz | |||
| 12 "6375" or "FRS 4" | 462.6375 MHz | |||
| 13 "6625" or "FRS 5" | 462.6625 MHz | |||
| 14 "6875" or "FRS 6" | 462.6875 MHz | |||
| 15 "7125" or "FRS 7" | 462.7125 MHz | |||
| 16 Milwaukee Repeater | 449.125 | 444.125 | 127.3 | |
| 17 Pewaukee Repeater | 442.875 | 443.475 | 127.3 | |
| 18 | ||||
| 19 | ||||
| 20 | ||||
| 21 | ||||
| 22 | ||||
| 23 | ||||
| 24 |
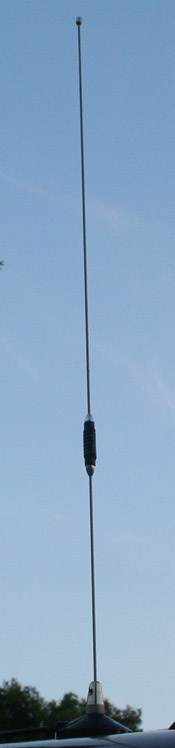
 For those of us
used to dealing with HF radios, the antenna for the GMRS bands is small and
simple. A half wave dipole would be about a foot long. In the UHF bands, antenna
height is probably the most important factor. In my own case, my antenna is a
quarter wave ground plane, sitting on the roof of my
house. This puts it at about 25 feet above the ground. Transmitting through this
antenna at 25 watts, I get a maximum range of about 12 - 15 miles.
For those of us
used to dealing with HF radios, the antenna for the GMRS bands is small and
simple. A half wave dipole would be about a foot long. In the UHF bands, antenna
height is probably the most important factor. In my own case, my antenna is a
quarter wave ground plane, sitting on the roof of my
house. This puts it at about 25 feet above the ground. Transmitting through this
antenna at 25 watts, I get a maximum range of about 12 - 15 miles.
If the above stated range sounds strange to you, when considering that the cheap little FRS radios are said to get anywhere from 15 - 30 miles, there is a reason for this. Marketers of FRS radios engage in a practice which most normal people would consider to be lying. Most of the little FRS radios out there would be lucky to have a range of a mile on a good day. This is in part due to the very low power permitted on FRS radios, but is also due to their small, no gain antennas.
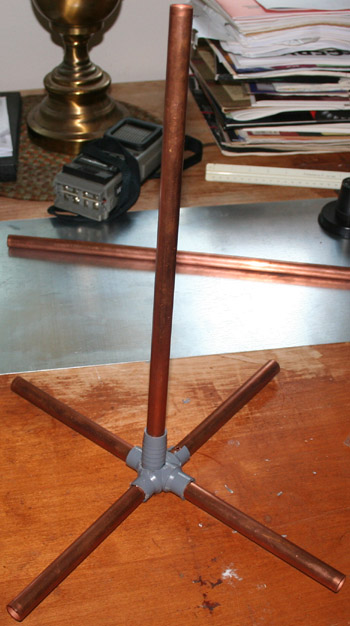
I built the base antenna myself, and it was as easy a job as I had ever done. A quarter wave radiator for 70 cm is about six inches long. I mounted it outside of the vent of my roof, and so far, no one seems to have noticed. The antenna is about a foot tall and a bit over a foot wide at the radials. It was constructed in an afternoon, from copper pipe, wire, and PVC fittings. The radials were drilled out, and a length of copper wire connects them to each other, and to the outside of the coax connector. I used conducting wire glue, rather than solder, to mount the radials with the PVC pipe connectors.
This is a classic, simple quarter wave ground plane antenna. I see a fair number of sophisticated antennas out there for 440. There are Yagi types as well as a variety of 5/8 wave types. I have to wonder why. With a maximum line of sight range of 15 miles or so, 25 watts available for making contacts, and no possibility of working skip, why bother? Remembering my old Starduster CB antenna from the eighties, I considered angling the radials down to flatten the pattern a bit, but again, why bother? So the antenna is as simple as can be, with radials making a ground plane of just over half a wave, and a quarter wave vertical element being used as a radiator.
Once the antenna was tuned (by trimming the radiator), I found SWR to be very low all across the band. Experimenting with my 440 handheld at its lowest power setting, I noted that there was a considerable amount of gain, compared to the duck antenna. Perhaps a more accurate way to put it would be to say that there was far less loss. One very nice feature of the antenna is that I only need to have the radiator sticking out of the roof - the radials can stay hidden inside.
Though such an antenna could be more easily and more cheaply made of wire, I went with the pipe, because it does offer a few advantages. Radial diameter affects bandwidth. Thus an antenna with pipe will have a greater bandwidth and be a bit more forgiving than that made of wire. This is an important consideration for a less than perfect antenna maker like myself. A pipe is also self supporting and will hold its shape. In addition, at this small size, there is not a huge cost difference in making an antenna from pipe. About five dollars worth of copper pipe did the job.
When I travel, this radio goes with me. Yes, I am a ham, and I do have access to radios with much more power; but GMRS is often better for day to day use. One big advantage is that family members can use these radios, and that I can use them to communicate with the FRS units as well (at a reduced power of 7 watts). In the National Parks, and similar places, it is nice to be able to give each of the kids a good quality GMRS and then let them go off on their little adventures, knowing that we can contact them and monitor them.
In most ways this was a pretty easy installation, reminding me of installing my old mobile CB radio. I made no attempt to build my own antenna here. There is not much improvement to be made on a basic quarter wave whip, and it is not really cost effective to try. As a general rule, I get far more use from my two meter, and CB radios on the road. The GMRS radio is pretty strictly used for communicating with the kids and with friends, via some handhelds that I usually bring along. I am sometimes able to hit 70cm repeaters along the way, but not often. I have yet to be able to hit a GMRS repeater, but I suppose there are not that many around.
For a mobile antenna, I never ever tried to build my own. I use a standard Hustler 440 magnet mount antenna. The 440 ham band is close enough to the GMRS/FRS band that the same antennas can be used for both. Talking to another mobile unit, I have a range of perhaps eight miles. Talking to a handheld I may be able to get out as far as five or six miles.
| General | TK-760/760(H) | TK-860/860(H) |
|
Frequency Range Type 1 Type 2 Type 3 Type 4 |
148 ~ 174 MHz 136 ~ 156 MHZ
|
450 ~ 476 MHz 470 ~ 496 MHz 488 ~ 512 MHZ 406 ~ 430 MHz |
|
Channels |
32 Semi-Duplex Channels |
|
| Modulation | F3E | |
| Antenna impedance | 50 ohm | |
|
Channel Spacing |
30/15 kHz (PLL channel step 5/6.25 kHz) |
25/12.5 kHz (PLL channel step 5/6.25 kHz) |
| Input Voltage | 13.6 V DC negative ground | |
| Duty Cycle | RX 100% / Transmit: 20% | |
| Operating Temp Range | -22°F ~ + 140°F | |
|
Current Drain Standby Receive Transmit (Standard) Transmit (H-model) |
0.4 A 1.0 A 8.0 A 12.0 A |
0.4 A 1.0 A 8.0 A 10.0 A |
| Frequency Stability | ± 0.0003 % | |
| Dimensions (W x H x D) | 5½ x 1½ x 6¾ in. | |
| Weight (net) | 2.20 lbs | |
| RECEIVER (Measurements made per EIA/TIA-204-D) | ||
|
Sensitivity 12 dB SINAD |
0.25 µV (wide) 0.33 µV (narrow) |
0.28 µV (wide) 0.35 µV (narrow) |
|
Selectivity Wide/Narrow |
78 dB / 68 dB |
75 dB / 65 dB |
|
Intermodulation Distortion Wide/Narrow |
73 dB / 63 dB |
70 dB / 63 dB |
| Spurious Response | 80 dB | 75 Db |
| Audio Output | 4 W at 4 ohms with less than 5 % distortion | |
| Transmitter (Measurements made per EIA-152-C) | ||
|
RF Power Output Standard H-Model |
25 W 45 W |
25 W 35 W |
| Spurious Response |
70 dB |
65 dB |
|
FM Hum and Noise Wide/Narrow |
50 dB / 43 dB |
48 dB / 42 dB |
| Microphone Distortion | 600 ohms | |
|
Audio Distortion |
3% at 1 kHz |
|
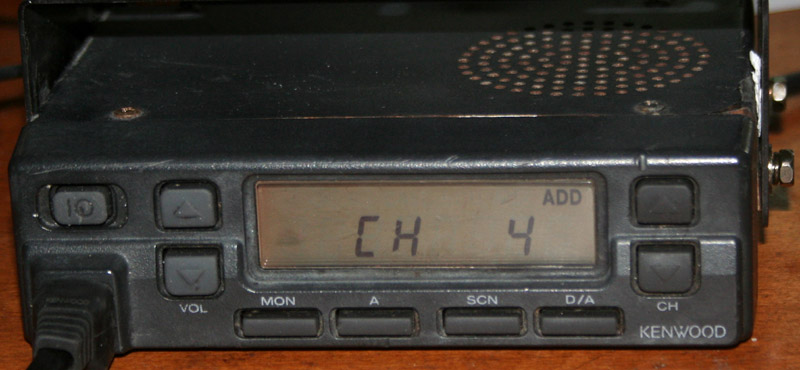
Front panel programming
If you are very lucky, the previous owner of your TK-860 may have set it up for front panel programming. It is a bit cryptic, and requires some patience, but you need no cable, nor do you have to attempt to run the original DOS programming software. If your radio is not set up for front panel programming, there is no easy way to do this. It requires soldering a diode on the PC board behind the display, and then connecting the programming cable and running software to enable this feature - so you will need the programming cable anyway. It is easy enough to determine if your radio is set up this way - simply depress the "A" button while powering up. If the radio flashes PROG, and then displays SEL, it is front panel programmable.
- Press and hold "A" key while turning the power on. ("SEL" will be displayed)
- Press "MON" ("CH 1" should be displayed.)
- Press "SCN" or "D/A" to select the channel to edit (1 - 32).
- Press "CHANNEL DOWN" to view the receive frequency
- If you see "------------" press "CHANNEL UP" and then use the following
to set the required frequency. If you see a frequency, use
the following to change it.
- "VOLUME UP" and "VOLUME DOWN" keys set frequency in megahertz .
- "SCN" and "D/A" keys set frequency in kilohertz.
- Display will now show either a number, or indicate "OFF". This is
receive CTCSS tone. Toggle on/off using channel up button.
Use "SCN" or "D/A" to select tone frequency. - Press "CHANNEL DOWN" to advance to transmit frequency.
- If you see "------------" press "CHANNEL UP" and then use the following
to set the required frequency. If you see a frequency, use
the following to change it.
- "VOLUME UP" and "VOLUME DOWN" keys set frequency in megahertz.
- "SCN" and "D/A" keys set frequency in kilohertz.
- Press "CHANNEL DOWN" to advance to next selection.
- Display will now show either a number, or indicate "OFF". This is
transmit CTCSS tone. Toggle on/off using channel up button.
Use "SCN" or "D/A" to change it to select tone frequency. - Press "CHANNEL DOWN" to advance through additional features - there are
four of them. Options are selected with D/A and SCN buttons.
- Add channel to scan (ADD/DEL)
- Unknown (ON/Off)
- Transmit power 5 watt or 25 watt (H/L)
- Unknown (UU/n)
- Pressing CHANNEL DOWN button after last feature will step you through to the next channel. (Channel number will appear.)
IMPORTANT - When you are done, turn the radio off, wait a second, turn it back on. This will save changes.
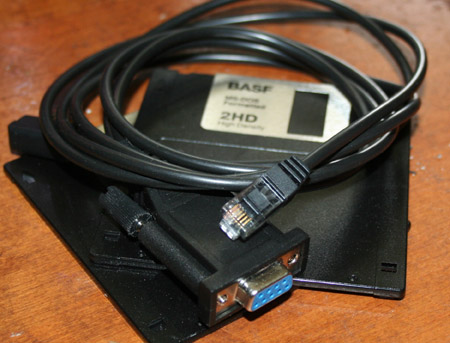
Cable/PC Programming
If your radio is not set up for front panel programming, you will need to program it with a cable connected to a PC. It is also somewhat easier to use the PC software, than to scroll through the various menus using the front panel buttons. I should warn you here that because this is DOS software, many people have had some real problems getting it to run properly. I have put some suggestions at the end of the section, in case you can not make it work. These instructions will work for the TK-760, TK-860, TK-860H, and TK-760 H. They will not work on the G models. You will need five things to program these standard and H model radios:
-
A KPG-4, KPG-46 (either can be used) or compatible cable, which connects to the computer's RS-232C port. You can not use a USB cable.
-
A copy of the KPG29D programming software (this can be found in a number of places on the web, including here).
-
A computer capable of running this from an RS-232C port, as well as an operating system which can run from a DOS prompt.
-
A copy of Dosbox ( http://dosbox.sourceforge.net/
-
The TK-860 radio.
 The
radio is fully programmable via software. Programming this old radio is a bit of
a pain, but can be done.
The programming cable connects to the RS-232C port of a PC, and then to the
modular microphone port on the radio. Kenwood calls this the KPG-4. The KPG-46
is also available, and I have seen versions for both USB and RS-232C. Because
the KPG29D programming software is in DOS, I would probably not attempt to use
the USB version of the programming cable. The newer G version of the TK-860 uses
the windows compatible KPG-56D programming software. I definitely have the older
standard model. If you are unsure of your particular model, you should be able
to find it on the type sticker on the back of the radio.
The
radio is fully programmable via software. Programming this old radio is a bit of
a pain, but can be done.
The programming cable connects to the RS-232C port of a PC, and then to the
modular microphone port on the radio. Kenwood calls this the KPG-4. The KPG-46
is also available, and I have seen versions for both USB and RS-232C. Because
the KPG29D programming software is in DOS, I would probably not attempt to use
the USB version of the programming cable. The newer G version of the TK-860 uses
the windows compatible KPG-56D programming software. I definitely have the older
standard model. If you are unsure of your particular model, you should be able
to find it on the type sticker on the back of the radio.
One problem with programming the TK-860 is that because the programming software is in DOS, and the old style RS-232C connector needs to be used for the cable, some new computers can not be used to program this radio. In addition, the software will not run properly on any OS past Windows 95/98. You will probably get an error message advising that there is not enough space for the environment.
The environment space
error is due to the fact that newer versions of Windows use a different memory
map than that used by DOS. This older memory map was used up until Windows
95/98, and then retired with the introduction of Windows 2000. The solution to this problem is either to find an old
computer and use it exclusively for DOS or Windows 95/98, or use Dosbox. Dosbox
can be found by following the link here http://dosbox.sourceforge.net/
 port on the computer, while the other
plugs into the microphone jack. The KPG-4, and KPG-46 cables are exactly the
same except that the KPG-4 uses a six pin modular connector, while the KPG-46
uses an eight pin connector - with the middle six pins wired exactly the same as
in the KPG-4. As long as you carefully center the KPG-4, it can be used in place
of the KPG-46.
port on the computer, while the other
plugs into the microphone jack. The KPG-4, and KPG-46 cables are exactly the
same except that the KPG-4 uses a six pin modular connector, while the KPG-46
uses an eight pin connector - with the middle six pins wired exactly the same as
in the KPG-4. As long as you carefully center the KPG-4, it can be used in place
of the KPG-46.
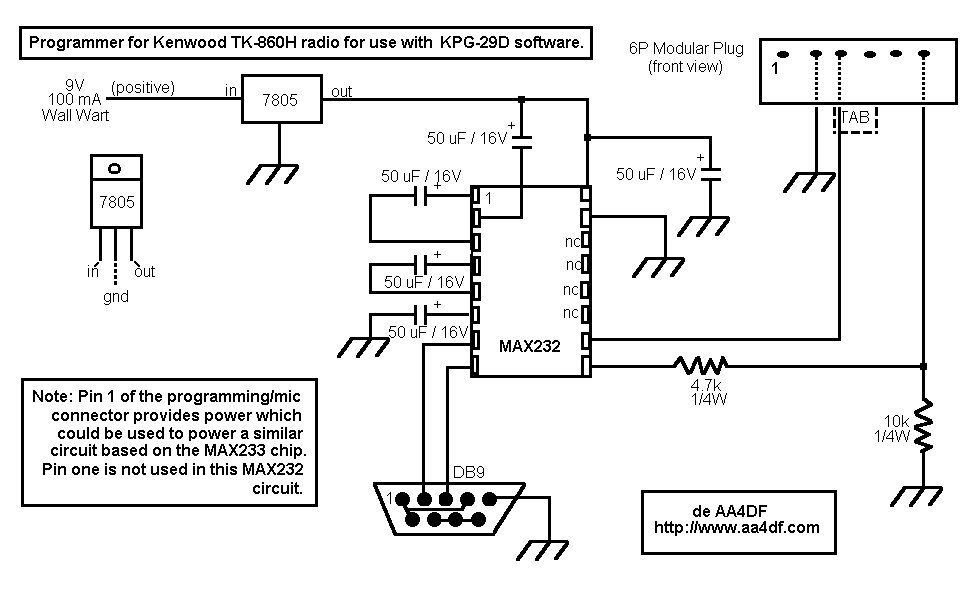
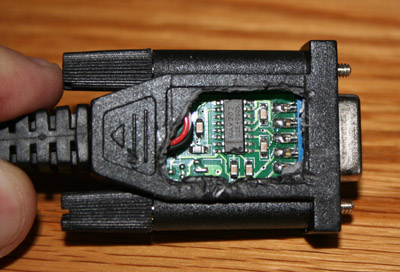 A look at the photo to the left or the schematic below should dissuade most from
any thought of building their own cable. In addition to the fact that it will
take an hour or two of your precious time, it will probably cost more to make
than to buy. On top of everything else, yours will probably not work as well as
the factory made unit. I had some initial problems talking to the radio, and my
first instinct was to blame the cable, but it turned out to be a problem with
the OS. Even though the software may seem to run perfectly, and it would appear
to be a cable/comm. issue, the most likely culprit will always be the DOS
prompt.
A look at the photo to the left or the schematic below should dissuade most from
any thought of building their own cable. In addition to the fact that it will
take an hour or two of your precious time, it will probably cost more to make
than to buy. On top of everything else, yours will probably not work as well as
the factory made unit. I had some initial problems talking to the radio, and my
first instinct was to blame the cable, but it turned out to be a problem with
the OS. Even though the software may seem to run perfectly, and it would appear
to be a cable/comm. issue, the most likely culprit will always be the DOS
prompt.
Using the software
 Once you have your radio
connected and turned on, and have properly set up your KPG29D program to work on
your computer, it is time to enter the frequencies you want. There are a couple
of things to keep in mind before you start. First, your mouse will be useless.
The old DOS programs did not know what a mouse was. Second, USB will be useless
for the same reason - you have to use the RS-232C version of the programming
cable. For those of us who are a bit older, and cut our teeth on DOS and the old
Apple 2, it will be a real trip down memory lane. Commands will be entered from
the command menu. This is accessed by hitting the ALT and F keys at the same
time, and then using the arrow keys to get to the appropriate command.
Once you have your radio
connected and turned on, and have properly set up your KPG29D program to work on
your computer, it is time to enter the frequencies you want. There are a couple
of things to keep in mind before you start. First, your mouse will be useless.
The old DOS programs did not know what a mouse was. Second, USB will be useless
for the same reason - you have to use the RS-232C version of the programming
cable. For those of us who are a bit older, and cut our teeth on DOS and the old
Apple 2, it will be a real trip down memory lane. Commands will be entered from
the command menu. This is accessed by hitting the ALT and F keys at the same
time, and then using the arrow keys to get to the appropriate command.
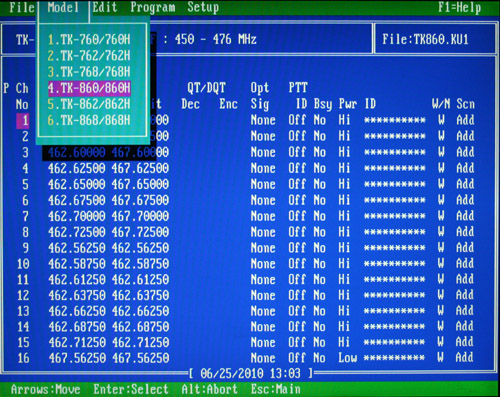
You will need to tell the program which model of radio you are programming. Since your mouse will not work, you will need to hit the ALT and F keys, which will get you into the menus. Use the arrow keys to move over to the Model menu, and then to scroll down to select the TK-860 model. Note that the only models this software can program are the 760, 762, 768, 860, 862, 868 - standard and H model. This will not program the G models, or any other TK series radios. If you have a G model, you will need the KPG-56D software.
Having used the arrow
keys to get to the 860 model, a submenu will come out asking which type and
frequency of 860 you are programming. In my case, I selected type F1 - 450 - 476
MHz. You will then be asked if the trunking board is installed, and will then
need to verify your selections. After this you will be warned that all data will
be erased. You will then be ready to program. One more thing to mention. The
help files are inaccessible in newer versions of Windows, but you may manually
open the entire help file in notepad. With the model selected, you will see a
main programming screen consisting of 32 rows (one for each channel), and a
number of columns. These will probably all be blank.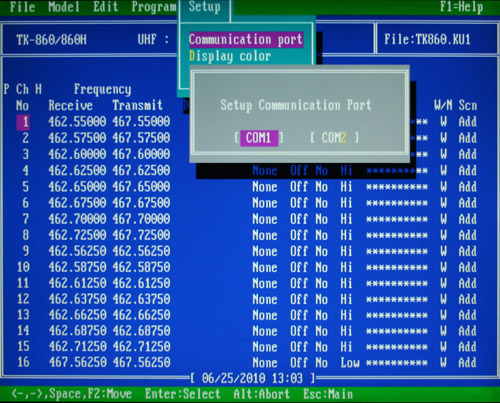
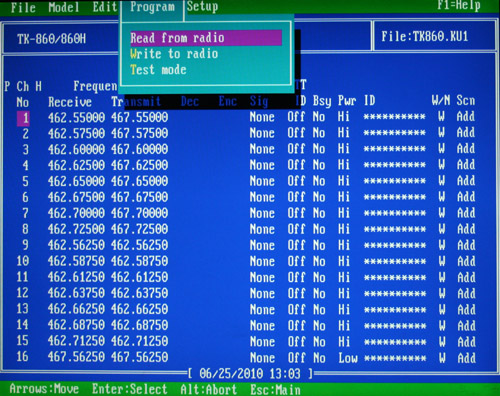
Next you will want to go into the setup menu and make certain that the proper comm. port is set. usually, you will want to have Com1 set up. Once you have done this, you will probably want to go to the Program menu, and select Read from radio. This will do two things. It will verify that your PC and radio are communicating, without changing anything, and it will tell you the present configuration of the radio. This should pretty well fill in the rows and columns with the radio's present settings. If it does not, you may have a problem. Using the arrow keys, you can jump to various entries. At the very least you will need to make entries for transmit and receive frequencies. You may also wish to make QT/DQT entries for encoding and decoding tones if you use repeaters.
This particular screen capture was taken after I had made my entries. You may notice that I have blank spaces in all of the QT/DQT tone spaces. This is because I have not set up any repeater tones, since I do not use repeaters for FRS/GMRS. You may also notice that entries one through eight are duplex channels (receive and transmit frequencies are different), while entries nine through sixteen are simplex channels (transmit and receive frequencies are the same). I also have all of these set for wide banding, and have high power (25 watts) for the first fifteen channels. Channels sixteen, through 22 are set to low power (5 watts), because they are FRS only channels.
Entry of the
transmit and receive frequencies is pretty straightforward. To
 enter
tones, use the F2 key to bring up a scrollable list of tones available. Use the
arrow keys to scroll the list, and the enter key to select the desired tone.
This will need to be done separately for transmit (ENC) and receive (DEC) tones.
Most users will probably not want to use receive tones. This is a useful feature
on fleet dispatch radios, but a real pain for hobbyist use. The same goes for
the Opt Sig, PTT ID, and BSY options. I generally leave them set to off or no.
The W/N setting determines whether the unit uses wide (25) or narrow (12.5)
banding. For right now, I leave my GMRS/FRS settings to wide, which I believe is
the current standard. On a few channels that I have set up for 70 CM repeater
use, I have this set to narrow. In a few years all radios will be required to
use narrow banding, so it is nice to know that this radio is capable of
compliance with the coming standards.
enter
tones, use the F2 key to bring up a scrollable list of tones available. Use the
arrow keys to scroll the list, and the enter key to select the desired tone.
This will need to be done separately for transmit (ENC) and receive (DEC) tones.
Most users will probably not want to use receive tones. This is a useful feature
on fleet dispatch radios, but a real pain for hobbyist use. The same goes for
the Opt Sig, PTT ID, and BSY options. I generally leave them set to off or no.
The W/N setting determines whether the unit uses wide (25) or narrow (12.5)
banding. For right now, I leave my GMRS/FRS settings to wide, which I believe is
the current standard. On a few channels that I have set up for 70 CM repeater
use, I have this set to narrow. In a few years all radios will be required to
use narrow banding, so it is nice to know that this radio is capable of
compliance with the coming standards.
Once you have
everything entered as you want it, you will need to send this information to the
radio. This is done by accessing the menus through the ALT + F keys, and then
scrolling to where it says, Write to radio. You will be warned that this will
erase all current settings and asked to verify that you really want to do this.
When you confirm, you should see the display on your radio change, and the
program will show a progress bar. You will then be advised that the programming
is complete. Congratulations! You have just programmed your radio.
Troubleshooting
If you can not communicate with the radio, verify that you are set to the correct comm. port. If you are uncertain, try taking turns using both comm. ports. If this fails, check the comm. port settings. They should be the following:
Bits Per Second: 9600
Data Bits: 8
Parity: NONE
Stop Bits: 1
Flow Control: Xon/Xoff
If the comm. settings are fine, and you have tried both comm. ports, then you may need to run this in pure DOS. The easiest way to do this is with a computer that has a floppy drive. You will need to make a DOS boot disc. This can be done by inserting a blank floppy, going into My Computer, right clicking on the A drive, which should be your floppy drive, and selecting the format option.
Selecting the Format option will bring up a box. On the lower portion of the box will be a check mark with the option of Create an MS DOS Startup Disc. You will want to check this selection. The drive will then work for a few moments, formatting and adding the boot files. Once this is done, you will want to format a second floppy, but without making it a start up disc. On this second disc, you will want to copy all of your KPG-29D files, so that they can be run from this disc.
Having made these two discs, you will want to make certain that your computer is bootable from the floppy drive. This will require going into the bios. I can give no definite instructions on how to do this, because it varies from computer to computer. With this done, you simply restart your computer, leaving the start up disc in the floppy drive. Your computer should come up with a black screen and a white A: prompt. Once you have this prompt, you will need to replace the start up disc with the KPG-29D program disc. With the program disc in place, type KPG29D. The program should then run as it should.
If you do not have a floppy drive on your computer, I recommend getting an older computer (Cheap as heck these days) and using it exclusively for radio programming. Barring this, you may wish to try making a bootable CD with the KPG-29D files on it, and then proceeding as with the bootable floppy. While certain programs (such as Nero) are able to make bootable CDs and DVDs, Windows has no native ability to do this.