Radio, and operational Accessories
The important parts of my radio station are shown in their own sections, though I suppose that what is important is open to interpretation. What is generally meant by using the term important, is expensive, complex, and troublesome. The accessories, and add on components which are used to compliment the function of the "important" gear are often equally vital to the operation of the station. Without a power supply, or microphone, a station is as dead as if there were no transceiver. Still, most of these items are collectively known as accessories.
| Power Supply | Antenna Tuner | Microphone | Balun |
| Code Key | Computer | Clock | |
| HF Linear | 2 Meter Linear | Speaker/Phones | Layout |
Comfort, Convenience, and Appearance
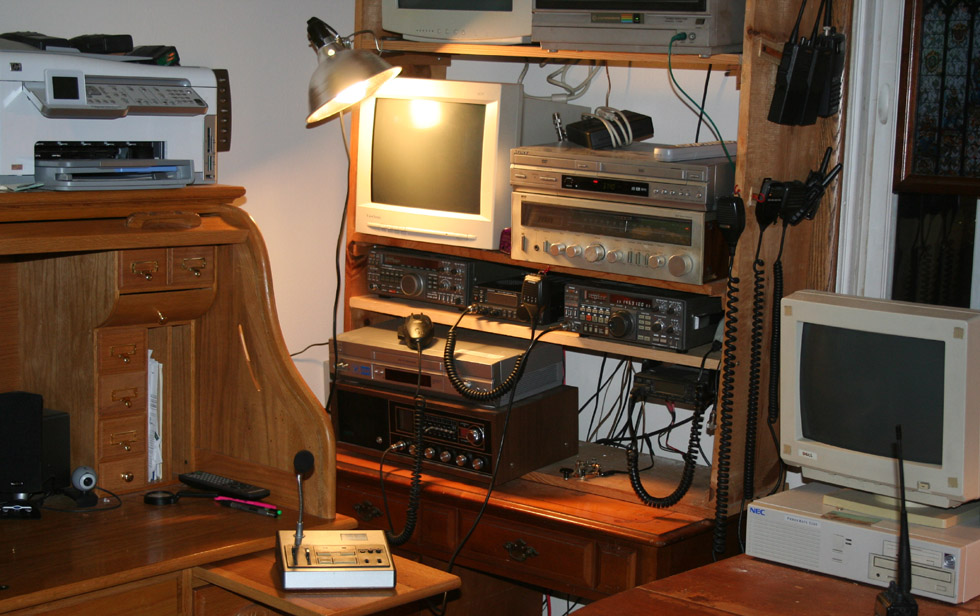
Assuming that you have gathered all of the gear that you need, or at least all that you can afford, you need a place from which to operate. Many ham stations operate out of a small corner of a bedroom or living room, others are housed in elaborate shacks. My first two stations were simply stacked on a desk, while many operators use bookshelves or other style shelving units. Whatever the means of the operator, all fixed base stations must be arranged with the following considerations:
-
proper presentation, and ergonomics
-
room for everything
-
nice appearance
-
proper cooling
-
connections for power, ground, and antenna
-
good lighting
In many ways, these needs are little changed from those that existed when radio was in its early days. Back in the early days of radio, and through much of its development, it was considered to be an exotic and experimental technology. The equipment used was large, heavy, delicate, and often carried dangerous amounts of current. It was also quite expensive and somewhat temperamental. These early radios also required quite a bit of electricity, and often of a particular voltage or series of voltages. Such gear required a skilled operator. Early radio operators were as much builder, repairman, and engineer as operator.
Because of these needs, and the nature of early radio, the stations were housed separately from everything else. If you had an early transmitter, you did not simply put it in your home or place of business. it required high voltage, and their was always the chance of fire or some such thing. So you put it outside in a little shed or dedicated small building - a radio shack. Today we have things much easier, but still call the place from which a station is operated a radio shack.
My present radio shack is the corner of a second floor bedroom which has been turned into a library. In most ways, this is as ideal a setup as the average city dweller (particularly a renter) will be able to manage. I have a full attic, which is unfinished, and separated from the second floor only by some rafters and a bit of wall board. This makes it easy to run antenna feeder, and also permits me a large uninterrupted space to run my antennas. Better still, the roof shows bare rafters, and the shingles and tar paper are not metallic, though there are metal nails holding them in. Though this isn't so great for my heating bills, it is a big advantage for stringing an indoor antenna.
Vital Bits
Power supply
 Without a power supply, most ham equipment can not be
used for base operations. Nearly all amateur gear is designed to run on 13.8
volt power. Military and commercial gear runs on a variety of voltages from
6 to 28 volts DC. Most transceiver models have matching power supplies produced
for them. This has the advantage of guarantying that the supply will be
sufficient for the needs of the unit, and that all cables, and connectors
match. These supplies will also be designed to match the styling of the
radios for which they are built. The only drawback, is that they are generally
the most expensive route; but for the ham who wishes to go first class,
this is the way to go.
Without a power supply, most ham equipment can not be
used for base operations. Nearly all amateur gear is designed to run on 13.8
volt power. Military and commercial gear runs on a variety of voltages from
6 to 28 volts DC. Most transceiver models have matching power supplies produced
for them. This has the advantage of guarantying that the supply will be
sufficient for the needs of the unit, and that all cables, and connectors
match. These supplies will also be designed to match the styling of the
radios for which they are built. The only drawback, is that they are generally
the most expensive route; but for the ham who wishes to go first class,
this is the way to go.
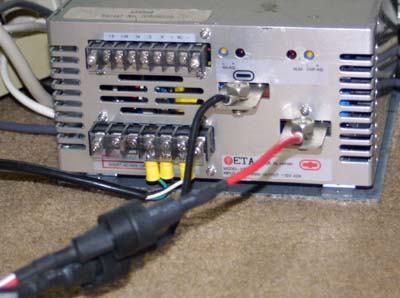
In my own case I picked up a lab power supply. This
is a 42 amp unit, which gives it quite an advantage over the Kenwood unit,
designed for my rig (the Kenwood unit puts out 30 amps). Of course, it does
not feature the Kenwood logo, nor does it match the styling of my radio.
Oh well, you can't have everything. The unit has multiple taps, for powering
a variety of gear, and has more than enough power to run several pieces of
gear at once, including more than one radio at a time. Something that may
turn out to be an advantage at some future date, is the ability to wire the
unit for several different voltages. This is done easily by simply connecting
the power feed to different combinations of terminals. This presumably will
give me the ability to operate military and commercial gear on 14, 28, 60
and whatever other voltages are out there. It is also possible to operate
units on different voltages concurrently. As a lab power supply, I assume
that the current supplied is clean, and pure.
Antenna Tuner
This is very nearly indispensable, for the operator
of most of today's multi band HF transceivers. The alternative is to have
a series of antennas cut to length for different bands. Of course, these would
then require an antenna switch to select the proper antenna for the band
being used. I sometimes see tuners made for two meter or six meter radios, but
consider these to be pretty pointless. The operation of a single band unit, like most of today's VHF/UHF
transceivers, should not require a tuner, with a proper antenna, as the antenna
will be adjusted once during installation, and then left alone. While there
are certainly performance advantages to having a properly tuned antenna,
or connecting through a tuner, the main reason for tuning is to prevent the
reflected waves, generated by high SWR, from frying the finals of the transmitter.
Many transceivers have fuses or circuits which protect against this, but
none are fail safe.
A number of today's transceivers are available with
built in antenna tuners. My own Kenwood TS-440SAT is so equipped. These are
automatic tuners, and you can hear them churning away when you set the
unit to tune. Most use little motors to turn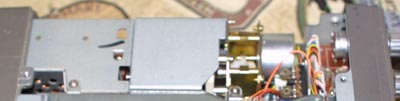 variable capacitors, or coils, until a proper match is established. These
units are very convenient, particularly when built into the radio, but
do not do a better job than a basic manual tuner. In some cases, as with
random wire antennas, or oddly designed, low bandwidth antennas, the manual
tuner can do a better job, or may even be the only way to get a match.
variable capacitors, or coils, until a proper match is established. These
units are very convenient, particularly when built into the radio, but
do not do a better job than a basic manual tuner. In some cases, as with
random wire antennas, or oddly designed, low bandwidth antennas, the manual
tuner can do a better job, or may even be the only way to get a match.
The tuner built into my Kenwood will not tune for 160
meters, and requires a 50 ohm impedance from the antenna/cable combination,
making it unable to directly tune random length wire antennas, or balanced antennas.
It also had a bit of a hard time tuning my Cliff Dweller antenna on certain
(30, 17, and 12 meter) bands. It is rated to tune for a resistive impedance
of between 20 and 150 ohms. The tuner should not be used for more than
30 seconds at a time, according to Kenwood, and three unsuccessful attempts
indicate that the tuner is not compatible with a given antenna system, on
a given band. The tuner sits in the right hand side of the transceiver,
and is standard on the TS-440SAT, and on option on the TS-440, and the TS-440S.
I eventually bit the bullet, and got myself an external manual antenna tuner
to compliment my auto tuner.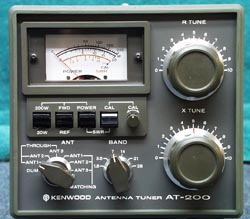 These days, I use the external tuner for the band, and then occasionally
fine tune with the built in unit.
These days, I use the external tuner for the band, and then occasionally
fine tune with the built in unit.
The manual tuner I picked up, is a Kenwood AT-200.
This model was designed to accompany the older, TS-520 transceiver. The
styling is close enough to mach that of my TS-440 nicely. The tuner has
connections for three antennas, including a wire. There is also a connection
for a dummy load. In addition to it's tuner, and SWR meter, the T-200 can
be used as a power meter. It will tune through all of the bands from 160
meters, up to 10 meters. Besides the tuning knobs, there are selector switches
for band preselection, as well as for selection of the antenna. The meter
is switchable for a maximum power reading of 20 or 200 watts.
All in all, this is a very nice unit, and gives me
a flexibility in antenna design, and selection, which the auto tuner did
not offer. I am looking forward to trying it out with some homebrew EH antennas,
and a long wire. I may try my hand at a few other types of antenna construction,
and a bit of experimentation. Resourceful ham operators have used tuners
to create resonance in all sorts of objects, making nearly anything metallic
into a potential antenna. In some cases, the performance is surprisingly
good. At any rate, possession of a good antenna tuner, will assure me of
reasonable antenna performance, no matter what the local restrictions on
type, and construction may be. This in combination with the ability to use
a longwire, may very well constitute the potential for the ultimate stealth
antenna.
Microphones
As with the power requirements, most amateurs will
find their units coming with a microphone more suited to mobile operation
than to use as a base. This is a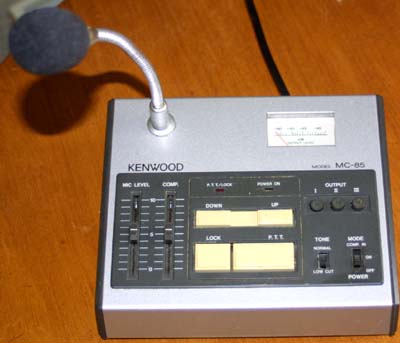 matter of taste, of course, and there are
many who will find the standard, basic, handheld mike perfectly satisfactory
for home use; others will wish to purchase a desk mike, or perhaps a headset.
The main advantage to a desk mike, is that it frees up the hands, though
most models have other advantages, and offer additional
features.
matter of taste, of course, and there are
many who will find the standard, basic, handheld mike perfectly satisfactory
for home use; others will wish to purchase a desk mike, or perhaps a headset.
The main advantage to a desk mike, is that it frees up the hands, though
most models have other advantages, and offer additional
features.
My particular model was made by Kenwood, and is one
of the more deluxe desk microphones on the market. It is the model MC-85.
This unit has a little control panel of it's own, and is specifically designed
to integrate with the Kenwood series of radios. Connection through the
standard Kenwood 8 pin plug gives the unit the capability to change frequencies,
via a switch on the mike panel. There are plugs on the back of the unit base
for connecting up to three radios, though the unit was only provided with
one cable. Buttons on the mike panel select between the three outputs. In
addition, there are slider switches to adjust pre amp, and compression levels.
A two position switch turns compression on and off. There is also a meter
to indicate the microphone output level. A tone switch, PTT, and PTT lock
complete the controls. A pair of LEDs, indicate power, and PTT lock. The
unit is battery operated. The actual microphone element is an electret condenser
unit on an adjustable goose neck mount. The styling of the unit is classic
seventies/eighties, and it is one of the more elaborate desk microphones on
the market.
The microphone is powered by many Kenwood radios, and has a battery box for use with radios which are not compatible with powering this mike. Extra cables can be purchased for connecting for up to three radios. The supplied PG-4G 8 cable is the standard connection for most Kenwood radios. 4 pin (PG-4D) and 6 pin (PG-4E) cables are also available, though they will require installation of 4 AA batteries, in a small compartment under the mike, accessible by removing a pair of screws. This is a 700 ohm mike with a 300 to 7000 Hz frequency response. Some users have reported that this mike is sensitive to RF interference, when running multiple radios; but I have had no such problems. Reports from other users indicate that unit should be checked for proper ground, and for improper insulation between the mike element, and the gooseneck.
Ordinarily, the balun is included as part of the antenna system, or perhaps as a component of the tuner. This balun is special. it is a Health B-1 Balun Coil set, in a metal case. Technically, a balun is a device for matching a balanced line, to an unbalanced line. It us usually used to connect a dipole antenna to the standard 50 ohm transceiver unbalanced coax input. When we talk about balanced and unbalanced, we are talking about the signal path. In a dipole antenna, the two elements radiate against each other, which is why the antenna is considered to be balanced. A vertical quarter wave radiates against ground. Most amateurs also use the humble balun to match the antenna to the feedline. The most common is to use a 4:1 balun to match a 200 - 300 ohm dipole to a 50 - 72 ohm coax.
This works great for a vertical quarter wave antenna. Such an antenna is
unbalanced. The way that it works is that the center connector of the coax is
bound to the antenna itself, and the outer connector goes to ground. This works
because it is the same way that the antenna connector for most transceivers is
set up. Where you run into a problem, is when you have a balanced antenna.
In a balanced antenna, like the common dipole, the center connector is bound to one antenna element, and the shield is connected to the other - balanced. This often gives a resistance states as being 300 ohms (some say 200 ohms). This has led many to consider a balun as a device used to match impedance, which is only partially true.
The main reason many operators use chokes, and antennas tuners, is to prevent destruction of their finals. This was not always so important. Long ago, when tube finals and plates were used, finals were quite a bit hardier. Today, with solid state finials, an SWR of over 4:1 can fry most finals.
It would seem like a choke would make no difference in signal strength, at best, and perhaps waste some RF at worst, but this is not the case. Ideally, any RF that is left over would run back and forth down the cable until it is reradiated, or used up as heat - a good choke prevents this from happening. It does not allow the current to run back down the feeder line, and thus forces it to radiate.
I am presently using a Heathkit box style balun, official labeled as the Heathkit Balun Coil Set. It consists of a pair of large, air wound bifiler coils inside of a metal box. There is a standard coax cable on one side, and a pair of connectors for twin lead on the other. The Heath balun can be connected either as a 1:4 or a 1:1 balun. Though a 1:1 does not make sense, to many hams, it is a way to match an unbalanced load to a balanced load of the same resistance.
Where the Balun box really comes in handy is for feeding a radio with a built in tuner, via a length of ladder line.
Key
 Considered as an obsolete holdover from past days, a rite of passage for new hams to get on the international bands, a burdensome
requirement, or the mark of a true radio enthusiast, CW (Carrier Wave) operation is assumed
to be a capability of any good fixed base operation. For a long time, this was
the real sticking point to my entry into ham radio. My code skills are
dismal (some would go so far as to say that they are non-existent). I therefore
do not have a very elaborate key; but then, how elaborate could something
like a telegraph key get? It would seem that picking a key would be an easy
thing. We all know what they look like, from war movies, cowboy movies,
and adventure shows. We all know how they work too. You simply tap out the
dots and dashes on them, to be translated by the listener on the other end.
Of course, nothing that attracts any sort of hobby or recreational user
ever stays simple. There are a variety of keys, and code generating devices
out on the market; what most of us picture is the straight key.
Considered as an obsolete holdover from past days, a rite of passage for new hams to get on the international bands, a burdensome
requirement, or the mark of a true radio enthusiast, CW (Carrier Wave) operation is assumed
to be a capability of any good fixed base operation. For a long time, this was
the real sticking point to my entry into ham radio. My code skills are
dismal (some would go so far as to say that they are non-existent). I therefore
do not have a very elaborate key; but then, how elaborate could something
like a telegraph key get? It would seem that picking a key would be an easy
thing. We all know what they look like, from war movies, cowboy movies,
and adventure shows. We all know how they work too. You simply tap out the
dots and dashes on them, to be translated by the listener on the other end.
Of course, nothing that attracts any sort of hobby or recreational user
ever stays simple. There are a variety of keys, and code generating devices
out on the market; what most of us picture is the straight key.
In the early days of ham radio,
and for decades beforehand for generations of telegraphers, long distance
communication meant sending code, via key. For telegraph operators, an
entire eight to ten to twelve hour work day might be spent sending code.
After some years of this, telegraph operators would develop what was known
as Glass Arm. This appears to have been some sort of carpal tunnel
syndrome. The culprit was the constant wearing repetition of movement, over
long periods of time. In order to combat this, a new type of telegraph key
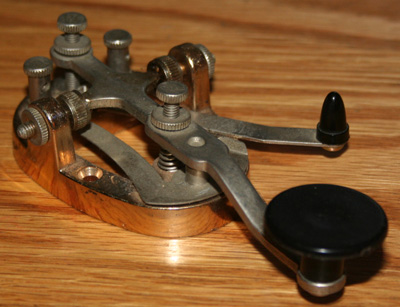
was developed in the 1880s, called the Sideswiper, also known as the Cootie.
The Cootie worked by flipping the paddle from side
to side, instead of straight down. Rather than placing your fingers on top
and tapping down, the Cootie worked by grasping it sideways, the same way
that you hold a housekey before turning it in a lock. You then formed dots
and dashes by rocking the key from side to side. For some reason, probably
known to orthopedists and anatomists, this is much easier on the arm and
joints. It could also be quite a bit faster, as characters could be formed
on the backstroke. The Cootie had contacts on both sides of its travel, so
that a dot or a dash could be made by rocking the paddle in either
direction. The Cootie was in popular use until the 1920s, when it was
replaced with something more advanced, called the Bug.
Technically know as the Vibroplex, the bug was a
sideswiper, just like the Cootie; but it was a bit more automated. Where the
Cootie could send either a dot or a dash, from either direction, the bug
made a dot when pressed to the right by the thumb, and a dash when pressed
to the left by the forefinger. This really took some getting used to but
could be quite fast once mastered, and always sent perfectly formed
characters.
During the seventies and eighties,
automation, and emerging digital electronics made it possible to use memory
keyers. Generally, these were used along with a regular key, and would
remember certain letter combinations, like the station's call sign.
Eventually, availability of fairly powerful computers made it possible to
send code via a computer keyboard, and to have it decoded by computer and
displayed on a screen.
Performance Enhancements
2 Meter linear amp
HF linear amp
Computers and software (C)
Computers are nearly indispensable in everything today,
having crept into most human activities over the years. Ham radio is no exception.
I go into a bit more detail in my section on Porky the computer; but have
not yet been able to do the subject justice, and do hope to expand on this
subject in the future.
External speaker/phones
Even the most basic, primitive units have built in
speakers. The problem is that these are often basic, primitive speakers.
Companion speakers are made for most transceivers, and many hams use
headphones.
Clock or clock software.
FCC regulations require a station to be identified
at regular intervals. It helps to have a clock with a timer, to insure compliance.
Actually, a clock is a great accessory, in any case. They are helpful in
logging contacts, keeping up with nets, and even occasionally for telling the
time. Back in the old days, radio manufacturers sold station consoles with
clocks, timers, SWR meters, and other features built in. Today we use computer
clock software, or radio controlled atomic clocks.