The Canon A-1![]()
|
Type | 35 MM SLR |
| Shutter Range | 30 sec - 1/1000 sec | |
| Shutter Type | Rubberized Cloth, Horizontal travel, electronically controlled focal plane | |
| Meter Type | Silicon | |
| Meter Range | EV -2 to EV 18 at ASA 100 | |
| Exposure System | Six mode manual/automatic | |
| lens Mount | Canon FD manual focus | |
| Battery | 6volt 544 A544 PX28 or PX28L |
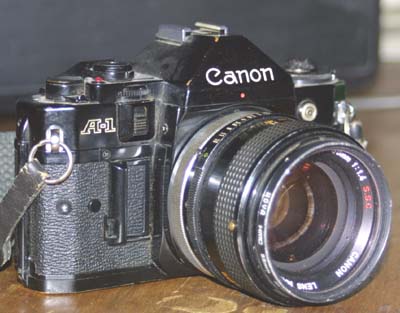
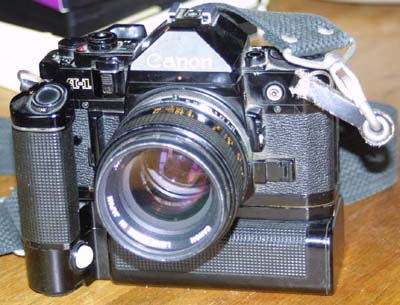
This was Canon's top of the line consumer camera, and though some pros did use it, it was never put forth as a professional grade camera, or as a successor to the F-1. Instead, Canon introduced a somewhat enhanced version of the F-1 (without the A-1's digital features) shortly after the A-1 was introduced. The lighter construction of the A-1, and it's dependence on battery power, as well as it's rubberized cloth shutter, made it a questionable choice for the working pro. It also took some study to learn all of the various modes, and features, and most serious photographers considered it a bit too elaborate for their needs. Most pros did not need the auto features, or the selection of bells and whistles. Many actually resented them as unnecessary gimmicks, and unneeded distractions. As a demonstration and showpiece of late 1970's high tech, this was a wonderful camera, a real marvel of the camera maker's art. As a working tool for the dedicated photographer, it was a bit too "busy".
Though this was never to become Canon's pro grade camera, it did somewhat follow the system concept of the F-1. There were data backs available, as well as motor drives and winders. Canon also introduced a new TTL flash system, along with a line of automatic flash units. There was a light sensor in the camera body which read exposure directly from the film surface, and sent the information to the flash unit. This killed Canon's old CAT system, and made many older automatic flash units obsolete. The focus screens could be changed, by a camera technician, but not the prism. What this camera offered to the consumer was a newly designed magnetic shutter, an exceptionally sensitive meter, multimode exposure, including several types of autoexposure, a lightweight, economical system concept, and features, many features.
The new shutter, common to all of the A series cameras is a focal plane unit with a rubberized cloth curtain. While the physical appearance is identical to that of the F series, this shutter is electromagnetic, rather than mechanical. This makes it easier for the digital circuitry to control the shutter, and thus many features may be added. Unfortunately, this also makes the camera, battery dependent, for the use of it's shutter. The fastest shutter speed is 1/1000 of a second the slowest is 30 seconds. One of the only real advantages of the electronic shutter, is it's ability to meter very long exposures. Most mechanical shutters are limited to 1 second as their slowest speed. There is also bulb for time exposures.
One of the most impressive features of this camera is it's meter. This has a range of EV 18 to EV -2, with ASA 100 film. This is very nearly the range of the F series canon with the booster, and is more than sufficient for all but the most extreme night photography. the lower end of the range works out to 8 seconds at F 1.4; this is not really even enough light to see by. The meter uses a center weighted system which, according to Canon, breaks the scene up into a number of zones, and resists being fooled by backlighting, and high contrast lighting.
One of the big selling points of the A-1 ws the introduction of multimode auto exposure. Since the introduction of autoexposure systems, there had been a kind of a friendly battle raging between the advocates of the Shutter priority system (Canon), and the aperture priority system (everyone else). One big problem that Canon had, was that it had taken what most photographers considered to be the wrong side in this battle. The Canon EF, and the Canon AE1 were both shutter priority cameras. The shutter priority system has two big disadvantages. The first is that you can run out of aperture, particularly with telephoto lenses. There is also little creative latitude, when choosing shutter speed. One simply makes certain that the speed is high enough to prevent blurred pictures (or to insure them, if this is the effect being sought).
Canon claimed the following six modes of operation for the new A-1:
- Aperture priority User sets aperture; camera sets shutter speed
- Shutter priority User sets shutter speed; camera sets aperture
- Auto programmed Camera set both aperture, and shutter speed
- Auto flash Shutter is set to synch speed, and TTL unit sets power of flash
- Full aperture manual User sets aperture, and shutter speed according to meter readings
- Stopped down manual User sets aperture and shutter speed according to reading taken with lens stopped down
The main control for exposure, in all modes, is on the right hand side of the top of the camera. This dial sets either the aperture, or the shutter speed, depending upon which mode is set. Modes are switched between shutter priority, or aperture priority, by turning a collar which surrounds the shutter button. Fully programed exposure is chosen, by picking shutter priority, and turning the dial past the highest shutter speed (1/1000) until a green P is shown. The addition of a compatible auto flash unit will put the camera into auto flash mode, and an F will display in the middle of the digital display. Full aperture mode is selected by switching to shutter priority, and then depressing the A pin on the lens, and turning the aperture ring so that it is no longer on the A setting. Stopped down mode is selected by going into full aperture manual and then pushing the stop down lever, located to the left of the lens, all the way in until it locks. In either of the manual modes, the aperture is set using the aperture ring on the lens, while the shutter speed is set using the dial on the camera. In both cases, the viewfinder display shows the selected shutter speed. Unfortunately, the aperture in the display is not the selected aperture, set on the lens. Instead, the display shows the aperture selected by the meter, for what the camera has determined to be the best exposure. This must then be set manually on the lens.
Also on the right side of the top of the camera, are the film advance lever, the self timer, the on/off switch, the double exposure lever, and the frame counter. A red LED flashes when the self timer is activated. Next to the eyepiece is a small lever which closes an eyepiece shutter. On the left hand side of the camera is the film speed dial, along with the exposure compensation settings, and the film rewind lever. In front of these is the switch which turns the LED display off, along with the battery test button. Below these, on the left front of the camera, are the exposure lock, and exposure preview switch, below which, is the stop down lever.
The viewfinder was the first all digital display in an SLR. This was really cutting edge stuff, back when it was introduced. The digital numbers are displayed beneath the frame. These are the red LED displays, typical of the period. To the left, is shown the shutter speed, to the right is shown the aperture. The brightness of the digital display adjusts itself according to the light level. The viewfinder display can be activated briefly, by partially depressing the shutter button. The exposure lock button will also activate the display.
The A-1 takes the entire series of Canon FD lenses, as well as most of the older R, and FL type lenses, though stopped down metering must be used with the older lenses. The A-1 makes use of the A setting on the aperture ring of the FD series of lenses. The function of this was a mystery for years, until the introduction of the Canon EF camera, a few years before the A series were produced. The full series of lenses give a certain amount of flexibility for the photographer. Other than the lenses, and the availability of a motor drive, and winder, this is not really a true system camera. There are no optional finders, or screens, and though a data back was offered, there was never a bulk film back. The light weight, and extensive use of plastics, along with the battery dependence of the electronic shutter, gives further evidence that this was not conceived as a tool for the pro.
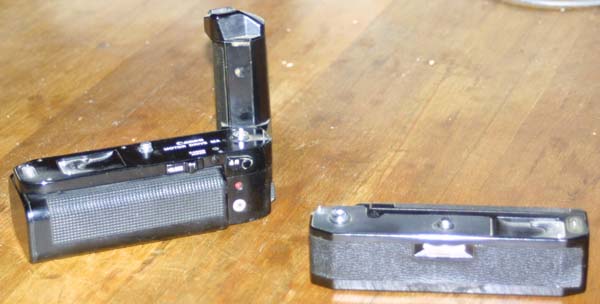 Physically, the motor drive, with it's power pack attached, was a bit larger
than the winder, and had it's own shutter switch mounted on a pistol grip.
There were two other shutter switches on the motor drive, including one mounted
on the side, for taking verticals, and another towards the base of the grip,
for high speed sequences. The winder uses the camera's own shutter button.
Physically, the motor drive, with it's power pack attached, was a bit larger
than the winder, and had it's own shutter switch mounted on a pistol grip.
There were two other shutter switches on the motor drive, including one mounted
on the side, for taking verticals, and another towards the base of the grip,
for high speed sequences. The winder uses the camera's own shutter button.
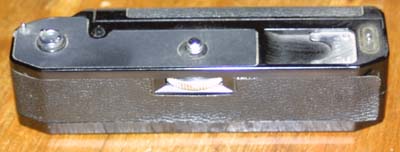
Both drive units fasten to the camera via the tripod mounting point on the bottom. A small metal cover needs to be removed first, in order to expose the ratchet unit in the camera body. On the power winder, this is all that need be done. On the motor drive, the power pack must be attached, after the drive unit is mounted on the camera. The power pack is snapped on, and then a lock lever is engaged to hold it firmly. Each drive unit has a handy clip, into which the metal cap from the camera may be kept to prevent loss.
The motor drive has two power pack options. The first is the nicad pack. This is a rechargeable unit, and is the more
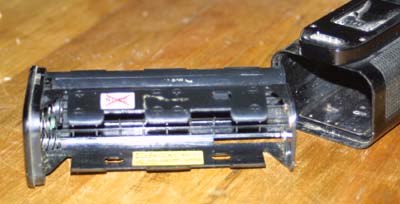 expensive of the two options. The second is the high speed pack, which is
the unit shown in the photographs. The high speed pack takes standard AA
batteries. It would seem that the high speed pack could be turned into a
rechargeable unit, of sorts, by using rechargeable AA batteries, but such
is not the case. Nicads can not be used in the high speed pack, because they
provide 1.25 volts each, as opposed to the 1.5 volts produced by a standard
AA cell. This is not enough voltage to operate the drive. The 12 AA batteries
required, make this an 18 volt power pack. The batteries all fit into a plastic
holder which is then snapped into the base of the power pack. The high speed
pack has a shutter release of it's own, a white button just under the grip,
which fires the camera at 5 frames per second, instead of the normal 3.5
frames per second. This option is not available on the nicad pack.
expensive of the two options. The second is the high speed pack, which is
the unit shown in the photographs. The high speed pack takes standard AA
batteries. It would seem that the high speed pack could be turned into a
rechargeable unit, of sorts, by using rechargeable AA batteries, but such
is not the case. Nicads can not be used in the high speed pack, because they
provide 1.25 volts each, as opposed to the 1.5 volts produced by a standard
AA cell. This is not enough voltage to operate the drive. The 12 AA batteries
required, make this an 18 volt power pack. The batteries all fit into a plastic
holder which is then snapped into the base of the power pack. The high speed
pack has a shutter release of it's own, a white button just under the grip,
which fires the camera at 5 frames per second, instead of the normal 3.5
frames per second. This option is not available on the nicad pack. Other features included in the motor drive are a plug for a remote unit. This can be used either for a remote control unit, by which the camera can be fired by a hand held controller, or an intervalometer, which will fire the camera at programmed intervals for time lapse photography. All in all, this is a pretty versatile unit. Though not as well built as the drive designed for the F-1, this is definitely designed as a professional tool. Roughly speaking, a motor drive differs from a winder in it's ability to advance the frames faster than would be possible manually. Most photographers would be unable to shoot 3.5 frames per second, advancing the film by hand, and would certainly not be capable of shooting 5 frames per second. On the other hand, the 2 frames per second offered by most winders is within the reach of the photographer who has practiced with his camera and come to know it's controls.
Though performing the same task, the winder originates from a different school of thought entirely. While the motor drive is a tool for the pro, a winder is more of a luxury for the casual photographer. A winder is simply a tool to advance the film, about as fast as the photographer could do it manually, and offers no increase in capability. As such, it is not considered a pro unit, and does not have many of the bells and whistles, power units, remote capability, or other features a working pro would expect. Still, I am not knocking the units. Within their limitations they are quite handy, and there are a few pros who have been known to use them for some less demanding tasks.
The main attraction of the winder is it's low cost, very low, compared to that of a true motor drive. When these units were new, the motor drive was selling for three to four times the price of the winder. Most photographers will never bother with remote controls units, nor will they shoot dozens of rolls of film at a single session, or need to shoot at very high frame rates. Under these less demanding conditions, the difference between the winder and the motor drive become moot. This was the approach taken when marketing the winder units. For the type of photography engaged in by most consumers, the winder is every bit as good as the motor drive, and while it might be hard for the non pro to spend $400 to $500 on a full fledged motor drive unit, $100 might be parted with for a winder.
Simplicity is the name of the game, with a winder. The unit is small, and attaches unobtrusively to the camera. There is no trigger grip, and the only control is an on/off switch on the side. The camera's own shutter button fires the unit, which advances the film at a relatively sedate 2 frames per second. There is no separate power pack, and therefore no power pack options. The power source consists of four AA cells, which fit into a detachable holder.